-- dba 접속
sqlplus sys/oracle as sysdba

-- 언어셋 변경
update sys.props$ set value$='AL32UTF8' where name='NLS_CHARACTERSET';
update sys.props$ set value$='AL16UTF16' where  name='NLS_NCHAR_CHARACTERSET';
update sys.props$ set value$='GERMAN_GERMANY.WE8ISO8859P1  ' where name='NLS_LANGUAGE';
commit;

- db 재기동
SHUTDOWN IMMEDIATE;
STARTUP MOUNT;

ALTER SYSTEM ENABLE RESTRICTED SESSION;

ALTER SYSTEM SET JOB_QUEUE_PROCESSES=0;

ALTER SYSTEM SET AQ_TM_PROCESSES=0;

ALTER DATABASE OPEN;

ALTER DATABASE CHARACTER SET INTERNAL_USE WE8ISO8859P1;

SHUTDOWN IMMEDIATE;

STARTUP;
NLS_LANGUAGE 변경 진행 과정
[oracle@153467d4adce ~]$ sqlplus sys/oracle@orclcdb as sysdba
SQL*Plus: Release 19.0.0.0.0 - Production on Wed Apr 13 10:04:38 2022 Version 19.3.0.0.0
Copyright (c) 1982, 2019, Oracle. All rights reserved.
Connected to: Oracle Database 19c Enterprise Edition Release 19.0.0.0.0 - Production Version 19.3.0.0.0
SQL> update sys.props$ set value$='AL32UTF8' where name='NLS_CHARACTERSET';
1 row updated.
SQL> update sys.props$ set value$='AL16UTF16' where name='NLS_NCHAR_CHARACTERSET';
1 row updated.
SQL> update sys.props$ set value$='GERMAN_GERMANY.WE8ISO8859P1 ' where name='NLS_LANGUAGE';
Total System Global Area 1610609928 bytes Fixed Size 9135368 bytes Variable Size 419430400 bytes Database Buffers 1174405120 bytes Redo Buffers 7639040 bytes Database mounted. SQL> ALTER SYSTEM ENABLE RESTRICTED SESSION;
System altered.
SQL> ALTER SYSTEM SET JOB_QUEUE_PROCESSES=0;
System altered.
SQL> ALTER SYSTEM SET AQ_TM_PROCESSES=0;
System altered.
SQL> ALTER DATABASE OPEN;
Database altered.
SQL> ALTER DATABASE CHARACTER SET INTERNAL_USE WE8ISO8859P1;
Total System Global Area 1610609928 bytes Fixed Size 9135368 bytes Variable Size 419430400 bytes Database Buffers 1174405120 bytes Redo Buffers 7639040 bytes Database mounted.
Database opened.
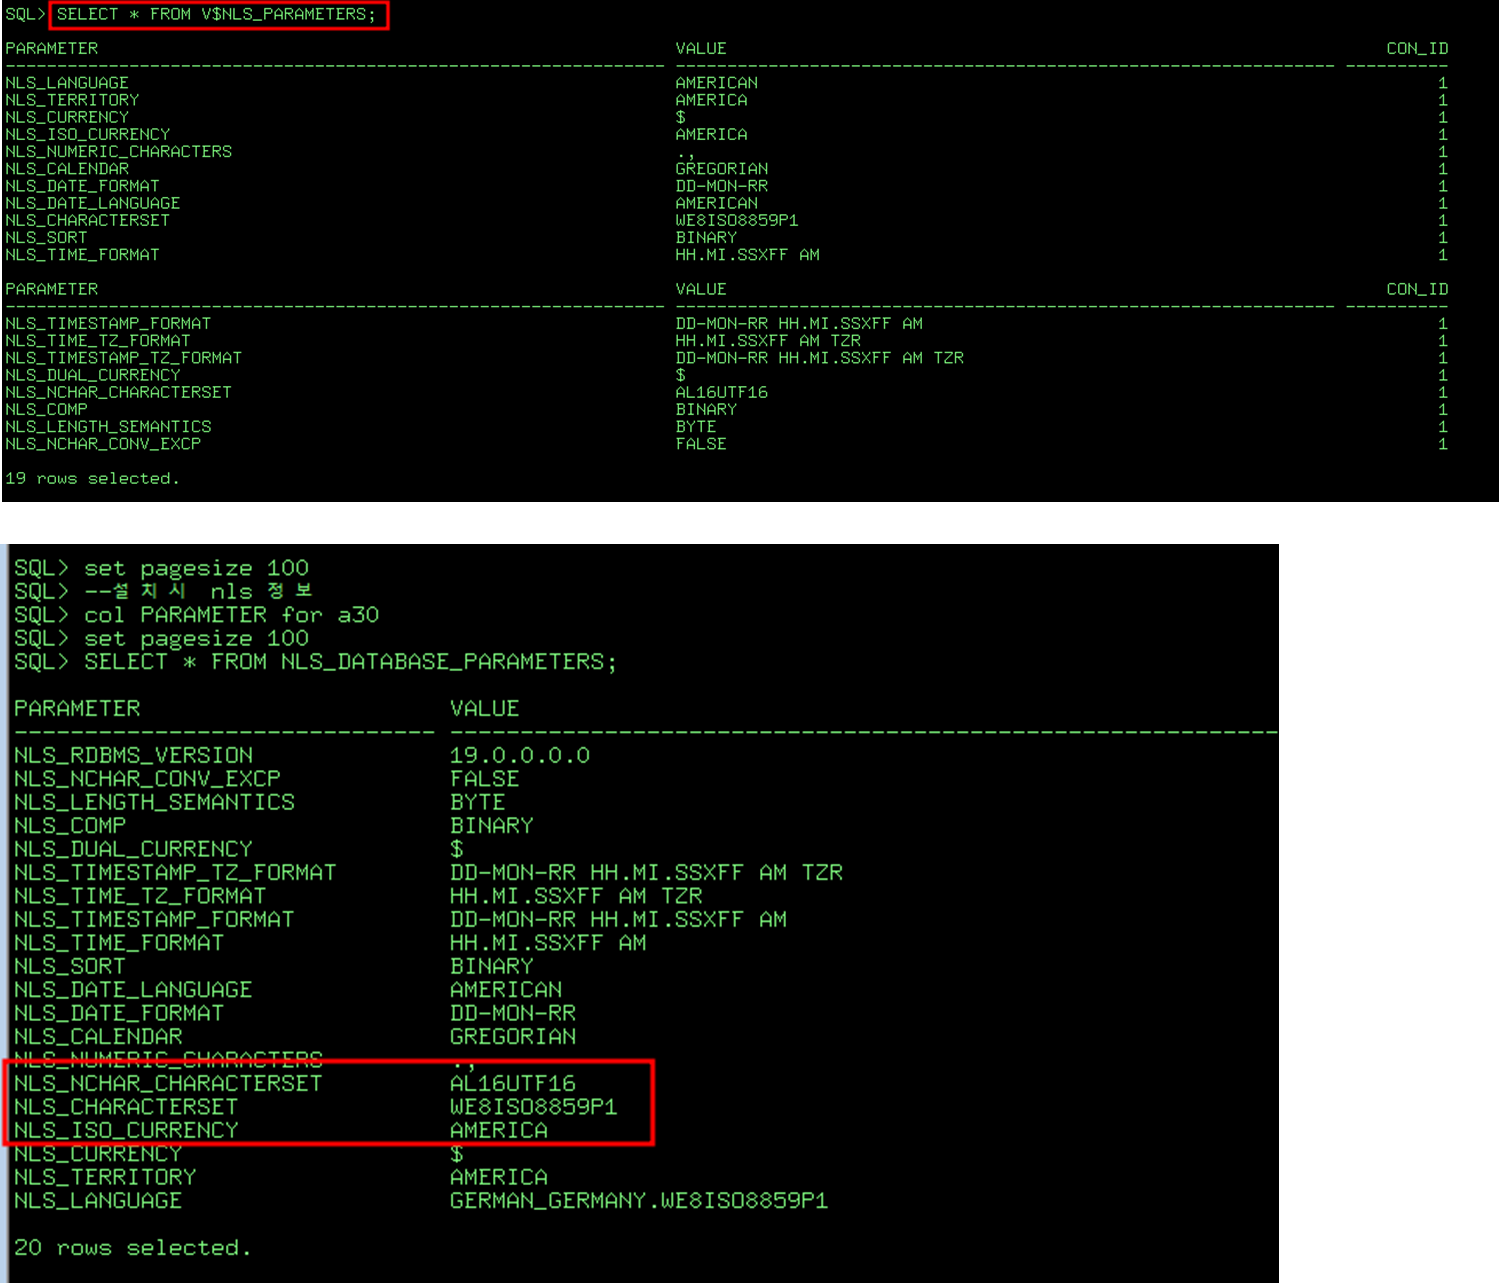
변경된 NLS 정보 확인 방법
set linesize 400
set pagesize 100
col PARAMETER for a30
col VALUE for a100
-- 현재 nls 구성정보
SELECT * FROM V$NLS_PARAMETERS;
--설치시 nls 정보
SELECT * FROM NLS_DATABASE_PARAMETERS;
--인스턴스 nls 정보
SELECT * FROM NLS_INSTANCE_PARAMETERS;
tar xvzf libiodbc-3.52.15.tar.gz

./configure --prefix=/usr/local --sysconfdir=/etc --disable-gui

make

make install
3.환경 파일 작성
odbc.ini
접속할 DBMS DNS 정보를 설정하는 파일 입니다.
.odbc 파일 읽는 순서 : $HOME 아래에 .odbc.ini를 만들면 해당 경로를 먼저 읽음
순서 : $HOME/.odbc.ini -> /etc/odbc.ini
vi .odbc.ini
[ODBC Data Sources]

Tibero7 = Tibero7 ODBC driver

[ODBC]

Trace = 1

TraceFile = /home/django/unixODBC/unixODBC-2.3.9/trace/odbc.trace

[Tibero7]

Driver = /home/django/tibero7/client/lib/libtbodbc.so

Description = Tibero ODBC driver for Tibero

server = 192.168.xxx.xxxx


#server는(ip,hostname 둘다가능)

port = 17000

#port 는 tibero port

database = tibero

#database 는  DB_NAME 입력

User =tibero

Password = tmax
4.접속 테스트
$ iodbctest "DSN=Tibero7;UID=tibero;PWD=tmax" iODBC Demonstration program This program shows an interactive SQL processor Driver Manager: 03.52.1521.0607 Driver: 07.00.0218 (libtbodbc.so)
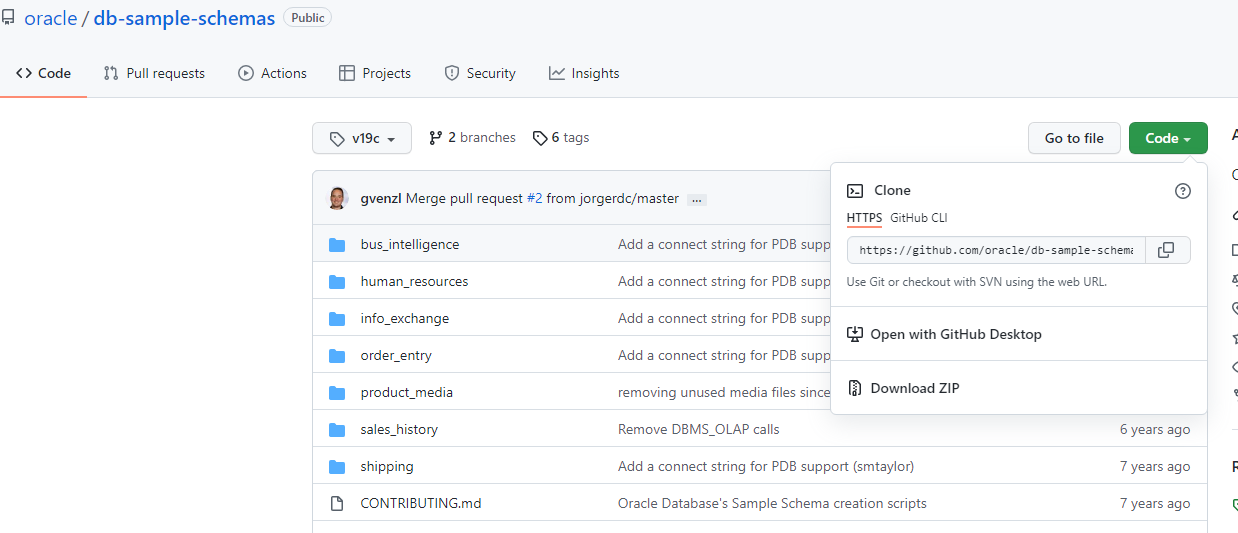
합계 128 drwxr-xr-x 11 oracle-docker oracle-docker 4096 3월 22 20:33 . drwx------ 12 oracle-docker oracle-docker 4096 3월 22 20:33 .. drwxr-xr-x 8 oracle-docker oracle-docker 4096 3월 22 20:33 .git -rw-r--r-- 1 oracle-docker oracle-docker 117 3월 22 20:33 CONTRIBUTING.md -rw-r--r-- 1 oracle-docker oracle-docker 1050 3월 22 20:33 LICENSE.md -rw-r--r-- 1 oracle-docker oracle-docker 5682 3월 22 20:33 README.md -rw-r--r-- 1 oracle-docker oracle-docker 5263 3월 22 20:33 README.txt drwxr-xr-x 2 oracle-docker oracle-docker 4096 3월 22 20:33 bus_intelligence drwxr-xr-x 2 oracle-docker oracle-docker 4096 3월 22 20:33 customer_orders -rw-r--r-- 1 oracle-docker oracle-docker 3633 3월 22 20:33 drop_sch.sql drwxr-xr-x 2 oracle-docker oracle-docker 4096 3월 22 20:33 human_resources drwxr-xr-x 2 oracle-docker oracle-docker 4096 3월 22 20:33 info_exchange -rw-r--r-- 1 oracle-docker oracle-docker 2740 3월 22 20:33 mk_dir.sql -rw-r--r-- 1 oracle-docker oracle-docker 27756 3월 22 20:33 mkplug.sql -rw-r--r-- 1 oracle-docker oracle-docker 7166 3월 22 20:33 mksample.sql -rw-r--r-- 1 oracle-docker oracle-docker 6592 3월 22 20:33 mkunplug.sql -rw-r--r-- 1 oracle-docker oracle-docker 6123 3월 22 20:33 mkverify.sql drwxr-xr-x 3 oracle-docker oracle-docker 4096 3월 22 20:33 order_entry drwxr-xr-x 2 oracle-docker oracle-docker 4096 3월 22 20:33 product_media drwxr-xr-x 2 oracle-docker oracle-docker 4096 3월 22 20:33 sales_history drwxr-xr-x 2 oracle-docker oracle-docker 4096 3월 22 20:33 shipping
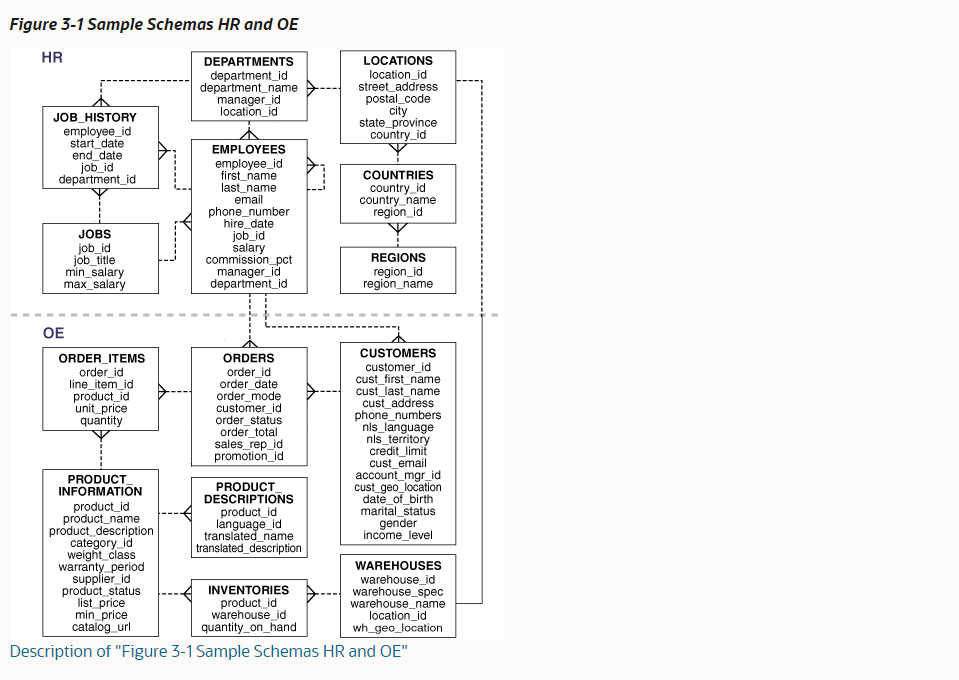
sample-schemas scripts 수행 설명 (mksample.sql)
sqlplus sys/oracle@orclcdb as sysdba

@/opt/oracle/oradata/db-sample-schemas/mksample.sql oracle oracle hr oe pm ix sh bi users temp /opt/oracle/oradata/db-sample-schemas/logs/ ora19c
$ vi mksample.sql Rem Rem $Header: rdbms/demo/schema/mksample.sql.sbs /main/12 2015/03/19 10:23:26 smtaylor Exp $ Rem Rem mksample.sql ...... ...... ......
PROMPT specify password for SYSTEM as parameter 1: DEFINE password_system = &1 PROMPT PROMPT specify password for SYS as parameter 2: DEFINE password_sys = &2 PROMPT PROMPT specify password for HR as parameter 3: DEFINE password_hr = &3 PROMPT PROMPT specify password for OE as parameter 4: DEFINE password_oe = &4 PROMPT PROMPT specify password for PM as parameter 5: DEFINE password_pm = &5 PROMPT PROMPT specify password for IX as parameter 6: DEFINE password_ix = &6 PROMPT PROMPT specify password for SH as parameter 7: DEFINE password_sh = &7 PROMPT PROMPT specify password for BI as parameter 8: DEFINE password_bi = &8 PROMPT PROMPT specify default tablespace as parameter 9: DEFINE default_ts = &9 PROMPT PROMPT specify temporary tablespace as parameter 10: DEFINE temp_ts = &10 PROMPT PROMPT specify log file directory (including trailing delimiter) as parameter 11: DEFINE logfile_dir = &11 PROMPT PROMPT specify connect string as parameter 12: DEFINE connect_string = &12 PROMPT
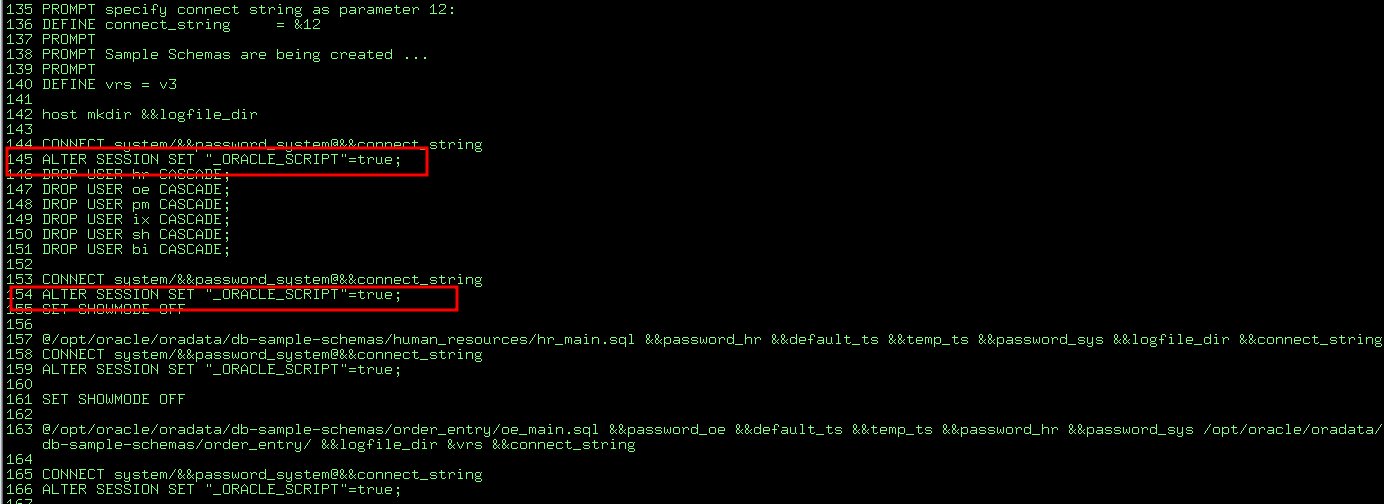
mksample.sql 파일 수정
스크립트를 수행하면 샘플 유저를 생성하는 과정에서 ORA-65096: invalid common user or role name 에러가 발생합니다 .
에러 발생을 막기 위해 ALTER SESSION SET "_ORACLE_SCRIPT"=true; 적용하겠습니다.
mksample.sql 스크립트중 CONNECT system/&&password_system@&&connect_string 구문 밑에 ALTER SESSION SET "_ORACLE_SCRIPT"=true; 를 추가합니다.
SQL> create user hr identified by hr; create user hr identified by hr * ERROR at line 1: ORA-65096: invalid common user or role name
mksample.sql 실행
SQL> @/opt/oracle/oradata/db-sample-schemas/mksample.sql oracle oracle hr oe pm ix sh bi users temp /opt/oracle/oradata/db-sample-schemas/logs/ ora19c
specify password for SYSTEM as parameter 1:
specify password for SYS as parameter 2:
specify password for HR as parameter 3:
specify password for OE as parameter 4:
specify password for PM as parameter 5:
specify password for IX as parameter 6:
specify password for SH as parameter 7:
specify password for BI as parameter 8:
specify default tablespace as parameter 9:
specify temporary tablespace as parameter 10:
specify log file directory (including trailing delimiter) as parameter 11:
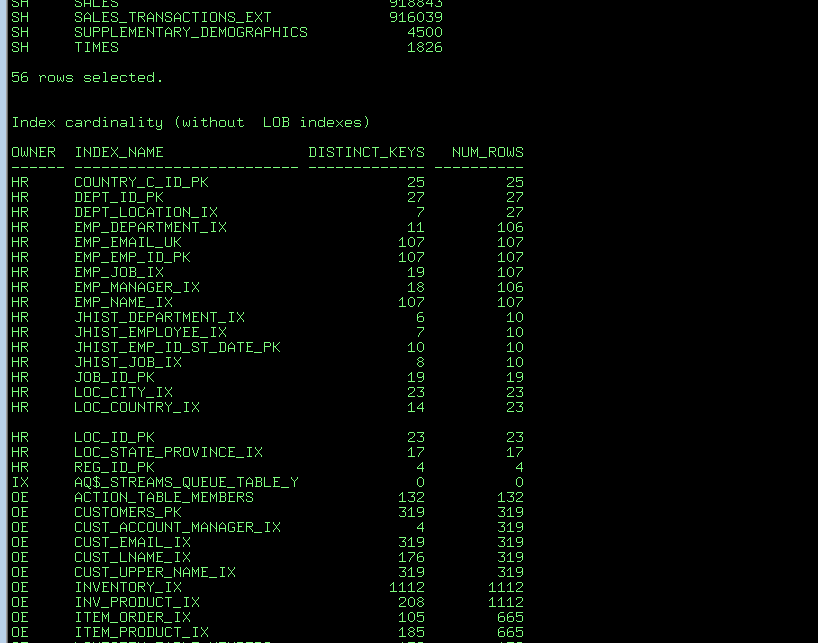
db-sample-schemas/logs]$ ll 합계 172 drwxr-xr-x 2 54321 54321 4096 3월 23 19:53 . drwxrwxrwx 12 oracle-docker oracle-docker 4096 3월 23 20:27 .. -rw-r--r-- 1 54321 54321 6284 3월 23 19:53 bi_v3.log -rw-r--r-- 1 54321 54321 2075 3월 23 19:53 chan_v3.log -rw-r--r-- 1 54321 54321 2318 3월 23 19:53 coun_v3.log -rw-r--r-- 1 54321 54321 3558 3월 23 19:53 cust1v3.log -rw-r--r-- 1 54321 54321 2751 3월 23 19:53 dem1v3.log -rw-r--r-- 1 54321 54321 2622 3월 23 19:53 dmsal_v3.log -rw-r--r-- 1 54321 54321 5508 3월 23 19:53 ext_1v3.log -rw-r--r-- 1 54321 54321 6199 3월 23 19:52 hr_main.log -rw-r--r-- 1 54321 54321 7038 3월 23 19:53 ix_v3.log -rw-r--r-- 1 54321 54321 59687 3월 23 19:53 mkverify_v3.log -rw-r--r-- 1 54321 54321 5985 3월 23 19:52 oe_oc_v3.log -rw-r--r-- 1 54321 54321 599 3월 23 19:53 pm_main.log -rw-r--r-- 1 54321 54321 5119 3월 23 19:53 pm_p_lob.log -rw-r--r-- 1 54321 54321 3616 3월 23 19:53 prod1v3.log -rw-r--r-- 1 54321 54321 2667 3월 23 19:53 prom1v3.log -rw-r--r-- 1 54321 54321 3104 3월 23 19:53 sale1v3.log -rw-r--r-- 1 54321 54321 6049 3월 23 19:53 sh_v3.log -rw-r--r-- 1 54321 54321 4743 3월 23 19:53 time_v3.log
mkverify_v3.log
The Customer Orders(CO) schema 스크립트 수행
mksample 에서는 co 생성 스크립트가 포함되어 있지 않습니다.
별도 스크립트로 수행해야 테스트 샘플 스키마가 생성 되게 됩니다.
수행 파일은 db-sample-schemas/customer_orders/co_main.sql 입니다.
SQL> @co_main Enter value for 1: co Enter value for 2: orclcdb Enter value for 3: users Enter value for 4: temp Dropping user drop user co * ERROR at line 1: ORA-01918: user 'CO' does not exist
Creating user
Grant succeeded.
User altered.
User altered.
Connected. Running DDL Creating tables, constraints and views for Customer Orders Creating tables
LSNRCTL for Linux: Version 19.0.0.0.0 - Production on 20-MAR-2022 13:34:19
Copyright (c) 1991, 2019, Oracle. All rights reserved.
Connecting to (DESCRIPTION=(ADDRESS=(PROTOCOL=IPC)(KEY=EXTPROC1))) The command completed successfully [oracle@01a4f713764f ~]$ lsnrctl stop
LSNRCTL for Linux: Version 19.0.0.0.0 - Production on 20-MAR-2022 13:34:23
Copyright (c) 1991, 2019, Oracle. All rights reserved.
Connecting to (DESCRIPTION=(ADDRESS=(PROTOCOL=IPC)(KEY=EXTPROC1))) TNS-12541: TNS:no listener TNS-12560: TNS:protocol adapter error TNS-00511: No listener Linux Error: 2: No such file or directory Connecting to (DESCRIPTION=(ADDRESS=(PROTOCOL=TCP)(HOST=0.0.0.0)(PORT=1521))) TNS-12541: TNS:no listener TNS-12560: TNS:protocol adapter error TNS-00511: No listener Linux Error: 111: Connection refused [oracle@01a4f713764f ~]$ lsnrctl start
LSNRCTL for Linux: Version 19.0.0.0.0 - Production on 20-MAR-2022 13:34:36
Copyright (c) 1991, 2019, Oracle. All rights reserved.
TNSLSNR for Linux: Version 19.0.0.0.0 - Production System parameter file is /opt/oracle/product/19c/dbhome_1/network/admin/listener.ora Log messages written to /opt/oracle/diag/tnslsnr/01a4f713764f/listener/alert/log.xml Listening on: (DESCRIPTION=(ADDRESS=(PROTOCOL=ipc)(KEY=EXTPROC1))) Listening on: (DESCRIPTION=(ADDRESS=(PROTOCOL=tcp)(HOST=0.0.0.0)(PORT=1521)))
Connecting to (DESCRIPTION=(ADDRESS=(PROTOCOL=IPC)(KEY=EXTPROC1))) STATUS of the LISTENER ------------------------ Alias LISTENER Version TNSLSNR for Linux: Version 19.0.0.0.0 - Production Start Date 20-MAR-2022 13:34:37 Uptime 0 days 0 hr. 0 min. 0 sec Trace Level off Security ON: Local OS Authentication SNMP OFF Listener Parameter File /opt/oracle/product/19c/dbhome_1/network/admin/listener.ora Listener Log File /opt/oracle/diag/tnslsnr/01a4f713764f/listener/alert/log.xml Listening Endpoints Summary... (DESCRIPTION=(ADDRESS=(PROTOCOL=ipc)(KEY=EXTPROC1))) (DESCRIPTION=(ADDRESS=(PROTOCOL=tcp)(HOST=0.0.0.0)(PORT=1521))) Services Summary... Service "ORCLCDB" has 1 instance(s). Instance "ORCLCDB", status UNKNOWN, has 1 handler(s) for this service... Service "ORCLPDB1" has 1 instance(s). Instance "ORCLPDB1", status UNKNOWN, has 1 handler(s) for this service... The command completed successfully
리스너 상태 확인
[oracle@01a4f713764f ~]$ lsnrctl status
LSNRCTL for Linux: Version 19.0.0.0.0 - Production on 20-MAR-2022 13:35:44
Copyright (c) 1991, 2019, Oracle. All rights reserved.
Connecting to (DESCRIPTION=(ADDRESS=(PROTOCOL=IPC)(KEY=EXTPROC1))) STATUS of the LISTENER ------------------------ Alias LISTENER Version TNSLSNR for Linux: Version 19.0.0.0.0 - Production Start Date 20-MAR-2022 13:34:37 Uptime 0 days 0 hr. 1 min. 7 sec Trace Level off Security ON: Local OS Authentication SNMP OFF Listener Parameter File /opt/oracle/product/19c/dbhome_1/network/admin/listener.ora Listener Log File /opt/oracle/diag/tnslsnr/01a4f713764f/listener/alert/log.xml Listening Endpoints Summary... (DESCRIPTION=(ADDRESS=(PROTOCOL=ipc)(KEY=EXTPROC1))) (DESCRIPTION=(ADDRESS=(PROTOCOL=tcp)(HOST=0.0.0.0)(PORT=1521))) (DESCRIPTION=(ADDRESS=(PROTOCOL=tcps)(HOST=01a4f713764f)(PORT=5500))(Security=(my_wallet_directory=/opt/oracle/admin/ORCLCDB/xdb_wallet))(Presentation=HTTP)(Session=RAW)) Services Summary... Service "ORCLCDB" has 2 instance(s). Instance "ORCLCDB", status UNKNOWN, has 1 handler(s) for this service... Instance "ORCLCDB", status READY, has 1 handler(s) for this service... Service "ORCLCDBXDB" has 1 instance(s). Instance "ORCLCDB", status READY, has 1 handler(s) for this service... Service "ORCLPDB1" has 2 instance(s). Instance "ORCLCDB", status READY, has 1 handler(s) for this service... Instance "ORCLPDB1", status UNKNOWN, has 1 handler(s) for this service... Service "da8f3910a1110e42e053020012ac8b77" has 1 instance(s). Instance "ORCLCDB", status READY, has 1 handler(s) for this service... The command completed successfully [oracle@01a4f713764f ~]$
sqlplus 접속 확인
[oracle@01a4f713764f ~]$ sqlplus sys/oracle@ora19c as sysdba
SQL*Plus: Release 19.0.0.0.0 - Production on Sun Mar 20 13:37:44 2022 Version 19.3.0.0.0
Copyright (c) 1982, 2019, Oracle. All rights reserved.
Connected to: Oracle Database 19c Enterprise Edition Release 19.0.0.0.0 - Production Version 19.3.0.0.0
TNSLSNR for Linux: Version 19.0.0.0.0 - Production System parameter file is /opt/oracle/product/19c/dbhome_1/network/admin/listener.ora Log messages written to /opt/oracle/diag/tnslsnr/4235c03b5d12/listener/alert/log.xml Listening on: (DESCRIPTION=(ADDRESS=(PROTOCOL=ipc)(KEY=EXTPROC1))) Listening on: (DESCRIPTION=(ADDRESS=(PROTOCOL=tcp)(HOST=0.0.0.0)(PORT=1521)))
Connecting to (DESCRIPTION=(ADDRESS=(PROTOCOL=IPC)(KEY=EXTPROC1))) STATUS of the LISTENER ------------------------ Alias LISTENER Version TNSLSNR for Linux: Version 19.0.0.0.0 - Production Start Date 23-FEB-2022 04:49:38 Uptime 0 days 0 hr. 0 min. 0 sec Trace Level off Security ON: Local OS Authentication SNMP OFF Listener Parameter File /opt/oracle/product/19c/dbhome_1/network/admin/listener.ora Listener Log File /opt/oracle/diag/tnslsnr/4235c03b5d12/listener/alert/log.xml Listening Endpoints Summary... (DESCRIPTION=(ADDRESS=(PROTOCOL=ipc)(KEY=EXTPROC1))) (DESCRIPTION=(ADDRESS=(PROTOCOL=tcp)(HOST=0.0.0.0)(PORT=1521))) The listener supports no services The command completed successfully [WARNING] [DBT-06208] The 'SYS' password entered does not conform to the Oracle recommended standards. CAUSE: a. Oracle recommends that the password entered should be at least 8 characters in length, contain at least 1 uppercase character, 1 lower case character and 1 digit [0-9]. b.The password entered is a keyword that Oracle does not recommend to be used as password ACTION: Specify a strong password. If required refer Oracle documentation for guidelines. [WARNING] [DBT-06208] The 'SYSTEM' password entered does not conform to the Oracle recommended standards. CAUSE: a. Oracle recommends that the password entered should be at least 8 characters in length, contain at least 1 uppercase character, 1 lower case character and 1 digit [0-9]. b.The password entered is a keyword that Oracle does not recommend to be used as password ACTION: Specify a strong password. If required refer Oracle documentation for guidelines. [WARNING] [DBT-06208] The 'PDBADMIN' password entered does not conform to the Oracle recommended standards. CAUSE: a. Oracle recommends that the password entered should be at least 8 characters in length, contain at least 1 uppercase character, 1 lower case character and 1 digit [0-9]. b.The password entered is a keyword that Oracle does not recommend to be used as password ACTION: Specify a strong password. If required refer Oracle documentation for guidelines. Prepare for db operation 중략....................... Completing Database Creation 51% complete 54% complete Creating Pluggable Databases 58% complete 77% complete Executing Post Configuration Actions 100% complete Database creation complete. For details check the logfiles at: /opt/oracle/cfgtoollogs/dbca/ORCLCDB. Database Information: Global Database Name:ORCLCDB System Identifier(SID):ORCLCDB Look at the log file "/opt/oracle/cfgtoollogs/dbca/ORCLCDB/ORCLCDB.log" for further details.
SQL*Plus: Release 19.0.0.0.0 - Production on Wed Feb 23 05:05:33 2022 Version 19.3.0.0.0
Copyright (c) 1982, 2019, Oracle. All rights reserved.
Connected to: Oracle Database 19c Enterprise Edition Release 19.0.0.0.0 - Production Version 19.3.0.0.0
SQL> System altered.
SQL> System altered.
SQL> Pluggable database altered.
SQL> PL/SQL procedure successfully completed.
SQL> SQL> Session altered.
SQL> User created.
SQL> Grant succeeded.
SQL> Grant succeeded.
SQL> Grant succeeded.
SQL> User altered.
SQL> SQL> Disconnected from Oracle Database 19c Enterprise Edition Release 19.0.0.0.0 - Production Version 19.3.0.0.0 The Oracle base remains unchanged with value /opt/oracle The Oracle base remains unchanged with value /opt/oracle ######################### DATABASE IS READY TO USE! ######################### The following output is now a tail of the alert.log: ORCLPDB1(3):ALTER DATABASE DEFAULT TABLESPACE "USERS" ORCLPDB1(3):Completed: ALTER DATABASE DEFAULT TABLESPACE "USERS" 2022-02-23T05:05:33.298695+00:00 ALTER SYSTEM SET control_files='/opt/oracle/oradata/ORCLCDB/control01.ctl' SCOPE=SPFILE; 2022-02-23T05:05:33.303320+00:00 ALTER SYSTEM SET local_listener='' SCOPE=BOTH; ALTER PLUGGABLE DATABASE ORCLPDB1 SAVE STATE Completed: ALTER PLUGGABLE DATABASE ORCLPDB1 SAVE STATE
XDB initialized.
Oracle 접속 및 테스트
$ docker exec -it oracle sqlplus sys/oracle@//localhost:1521/ORCLCDB as sysdba
$ docker exec -it oracle sqlplus sys/oracle@//localhost:1521/ORCLCDB as sysdba
SQL*Plus: Release 19.0.0.0.0 - Production on Wed Feb 23 08:04:55 2022 Version 19.3.0.0.0
Copyright (c) 1982, 2019, Oracle. All rights reserved.
Connected to: Oracle Database 19c Enterprise Edition Release 19.0.0.0.0 - Production Version 19.3.0.0.0
SQL> select * from dual;
D - X
SQL> create table TEST(id number, name varchar(100));
Table created.
SQL> insert into TEST values(1,'test');
1 row created.
SQL> commit;
Commit complete.
SQL> select * from TEST;
ID ---------- NAME -------------------------------------------------------------------------------- 1 test