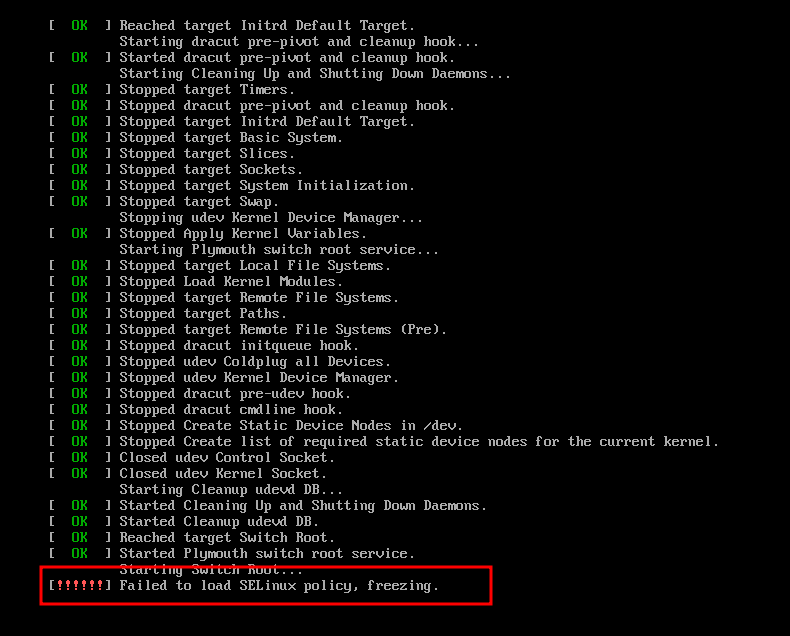
부팅시 Failed to load SELinux policy, freezing. 에러 발생
/etc/selinux/config 파일을 수정이후 부팅이 실패 할 경우
[root@centos7:/root]$ cat  /etc/selinux/config
# This file controls the state of SELinux on the system.
# SELINUX= can take one of these three values:
#       enforcing - SELinux security policy is enforced.
#       permissive - SELinux prints warnings instead of enforcing.
#       disabled - SELinux is fully disabled.
SELINUX=enforcing
# SELINUXTYPE= type of policy in use. Possible values are:
#       targeted - Only targeted network daemons are protected.
#       strict - Full SELinux protection.
SELINUXTYPE=targeted
[root@centos7:/root]$
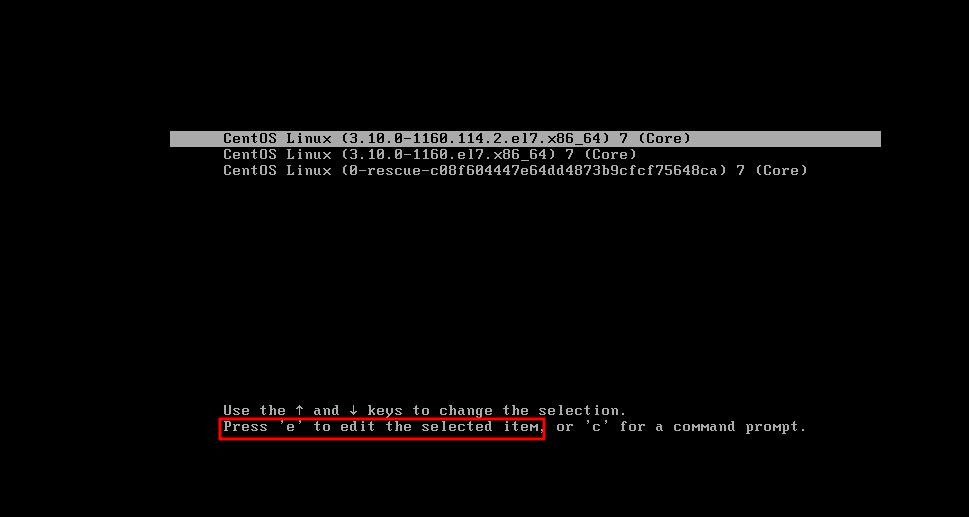
부팅 화면에서 키보드 e 를 누르고
selinux=0 추가 후 재부팅
Ctrl + x 를 누르면 다시 부팅이 된다.
SELinux 란?
SELinux(보안 강화 리눅스)는 리눅스 운영 체제의 보안 기능 중 하나로, 프로세스, 파일 및 네트워크에 대한 접근을 제어하는 매커니즘입니다. SELinux는 NSA(미국 국가 안보국)와 레드햇이 공동으로 개발한 프로젝트로, 리눅스 커널에 포함되어 있습니다.
/etc/selinux/config 파라미터 설명
enforcing 모드: 모든 SELinux 정책이 적용되고 보안 위반이 감지되면 해당 작업이 차단됩니다.
Disk /dev/sda: 500.1 GB, 500107862016 bytes 255 heads, 63 sectors/track, 60801 cylinders Units = cylinders of 16065 * 512 = 8225280 bytes
Device Boot Start End Blocks Id System /dev/sda1 * 1 13 104391 83 Linux /dev/sda2 14 60801 488279610 8e Linux LVM
Disk /dev/sdb: 1000.2 GB, 1000204886016 bytes 255 heads, 63 sectors/track, 121601 cylinders Units = cylinders of 16065 * 512 = 8225280 bytes
Device Boot Start End Blocks Id System /dev/sdb1 1 121601 976760001 83 Linux
파티션 분리
[root@centos7:/]$ fdisk /dev/sdb
The number of cylinders for this disk is set to 121601. There is nothing wrong with that, but this is larger than 1024, and could in certain setups cause problems with: 1) software that runs at boot time (e.g., old versions of LILO) 2) booting and partitioning software from other OSs (e.g., DOS FDISK, OS/2 FDISK)
Command (m for help): h h: unknown command Command action a toggle a bootable flag b edit bsd disklabel c toggle the dos compatibility flag d delete a partition l list known partition types m print this menu n add a new partition o create a new empty DOS partition table p print the partition table q quit without saving changes s create a new empty Sun disklabel t change a partition's system id u change display/entry units v verify the partition table w write table to disk and exit x extra functionality (experts only)
Command (m for help): d Partition number (1-4): 1
Command (m for help): d Selected partition 2
Command (m for help): d No partition is defined yet!
Command (m for help): d No partition is defined yet!
Command (m for help): p
Disk /dev/sdb: 1000.2 GB, 1000204886016 bytes 255 heads, 63 sectors/track, 121601 cylinders Units = cylinders of 16065 * 512 = 8225280 bytes
Device Boot Start End Blocks Id System
Command (m for help): n Command action e extended p primary partition (1-4) p Partition number (1-4): 1 <-- 첫번째 파티션 First cylinder (1-121601, default 1): Using default value 1 Last cylinder or +size or +sizeM or +sizeK (1-121601, default 121601): +500g <-- 첫번째 파티션 500g
Command (m for help): n Command action e extended p primary partition (1-4) p Partition number (1-4): 2 <-- 두번째 파티션 First cylinder (60790-121601, default 60790): Using default value 60790 Last cylinder or +size or +sizeM or +sizeK (60790-121601, default 121601): <-- 나머지 파티션 Using default value 121601
Command (m for help): w The partition table has been altered!
Calling ioctl() to re-read partition table. Syncing disks.
vi /etc/mail/local-host-names
# local-host-names - include all aliases for your machine here.
my.centos7.com
3. sendmail 서비스 시작
service sendmail start

#sendmail 이 리눅스 부팅시 실행되도록 설정.
chkconfig --level 2345 sendmail on
4. RELAY (IP 허용) :/etc/mail/access
접속 허용 IP 대역 추가 (Connect:192.168 RELAY)
access ip 적용 : makemap hash access < access
vi /etc/mail/access
# By default we allow relaying from localhost...
Connect:localhost.localdomain           RELAY
Connect:localhost                       RELAY
Connect:127.0.0.1                       RELAY
Connect:192.168                 RELAY

cd /etc/mail
makemap hash access < access
5. sendmail 테스트
5-4 번이 헷갈릴수도 있습니다.
꼭 DATA 입력후 엔터를 누른신 후 본문을 작성해 주세요 .
본문 작성이 끝나면 마침표로 "." 작성 완료를 해주세요
5-1.telnet 접속 telnet centos7 25
5-2.발신 메일 주소 입력 MAIL FROM:example@test.com
5-3.수신 메일 주소 입력 RCPT TO:jungki_min@tmax.co.kr
5-4. "DATA" 입력 후 본문 입력 "." 마침표로 메세지 발송 DATA
SUBJECT:Test Mail
5-5. 접속 종료
quit
telnet centos7 25 Trying 192.168.17.56... Connected to centos7. Escape character is '^]'. 220 my.centos7.com ESMTP Sendmail 8.14.7/8.14.7; Mon, 4 Apr 2022 18:09:28 +0900 MAIL FROM:example@test.com 250 2.1.0 example@test.com... Sender ok RCPT TO:usermail@daum.net 250 2.1.5 usermail@daum.net... Recipient ok DATA 354 Enter mail, end with "." on a line by itself SUBJECT:Test Mail . 250 2.0.0 23499Sdm021395 Message accepted for delivery quit 221 2.0.0 my.centos7.com closing connection Connection closed by foreign host.
$ telnet 192.168.17.56 Trying 192.168.17.56... Connected to 192.168.17.56. Escape character is '^]'.
Kernel 3.10.0-1160.el7.x86_64 on an x86_64 centos7 login: docker_test Password: Last login: Thu Mar 31 15:54:04 on pts/9
3.Telnet Command
아래 명령은 telnet 사용 기본 명령어 입니다.
#telnet 서비스 시작
systemctl start telnet.socket

#시스템 시작 시 자동으로 telnet 서버가 시작될 수 있게 활성화 시킨다.
systemctl enable telnet.socket


#telnet 서비스 정지
systemctl stop telnet.socket
systemctl disable telnet.socket

#tlent 서비스 상태 확인
systemctl status telnet.socket
ubuntu@ubuntu:~$ pwd /home/ubuntu ubuntu@ubuntu:~$ whoami ubuntu ubuntu@ubuntu:~$ sudo passwd root [sudo] password for ubuntu: New password: Retype new password: passwd: password updated successfully ubuntu@ubuntu:~$ su - root Password: root@ubuntu:~# whoami root root@ubuntu:~#
SSH Root 접속 허용 설정 (/etc/ssh/sshd_config)
#PermitRootLogin prohibit-password => PermitRootLogin yes 설정
root@ubuntu:~# vi /etc/ssh/sshd_config
#       $OpenBSD: sshd_config,v 1.103 2018/04/09 20:41:22 tj Exp $

# This is the sshd server system-wide configuration file.  See
# sshd_config(5) for more information.

# This sshd was compiled with PATH=/usr/bin:/bin:/usr/sbin:/sbin

# The strategy used for options in the default sshd_config shipped with
# OpenSSH is to specify options with their default value where
# possible, but leave them commented.  Uncommented options override the
# default value.

Include /etc/ssh/sshd_config.d/*.conf

#Port 22
#AddressFamily any
#ListenAddress 0.0.0.0
#ListenAddress ::

#HostKey /etc/ssh/ssh_host_rsa_key
#HostKey /etc/ssh/ssh_host_ecdsa_key
#HostKey /etc/ssh/ssh_host_ed25519_key

# Ciphers and keying
#RekeyLimit default none

# Logging
#SyslogFacility AUTH
#LogLevel INFO

# Authentication:

#LoginGraceTime 2m
#PermitRootLogin prohibit-password
PermitRootLogin yes
#StrictModes yes
#MaxAuthTries 6
#MaxSessions 10
SSH 서비스 재 시작 후 접속
sudo service ssh restart
일반계정 ssh ROOT 접속
일반계정에서 접속이 가능 한지 확인해보겠습니다.
ubuntu 계정에서 root 로 정상적으로 접속이 되고 있습니다.
ubuntu@ubuntu:~$ ssh root@192.168.58.130 The authenticity of host '192.168.58.130 (192.168.58.130)' can't be established. ECDSA key fingerprint is SHA256:HXSV8v929Lw15GM4sjnyr8Od6Y/84S1jrajWaC7PFtk. Are you sure you want to continue connecting (yes/no/[fingerprint])? yes Warning: Permanently added '192.168.58.130' (ECDSA) to the list of known hosts. root@192.168.58.130's password: tiberoPermission denied, please try again. root@192.168.58.130's password: Welcome to Ubuntu 20.04.4 LTS (GNU/Linux 5.13.0-37-generic x86_64)
17 updates can be applied immediately. To see these additional updates run: apt list --upgradable
Your Hardware Enablement Stack (HWE) is supported until April 2025. *** System restart required *** Last login: Sat Mar 26 07:13:22 2022 from 192.168.58.130 root@ubuntu:~# whoami root
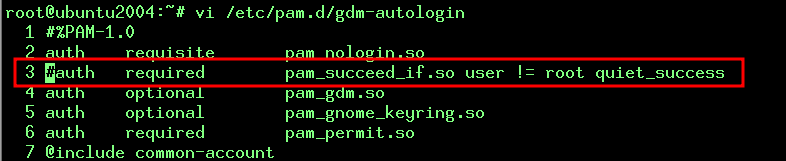
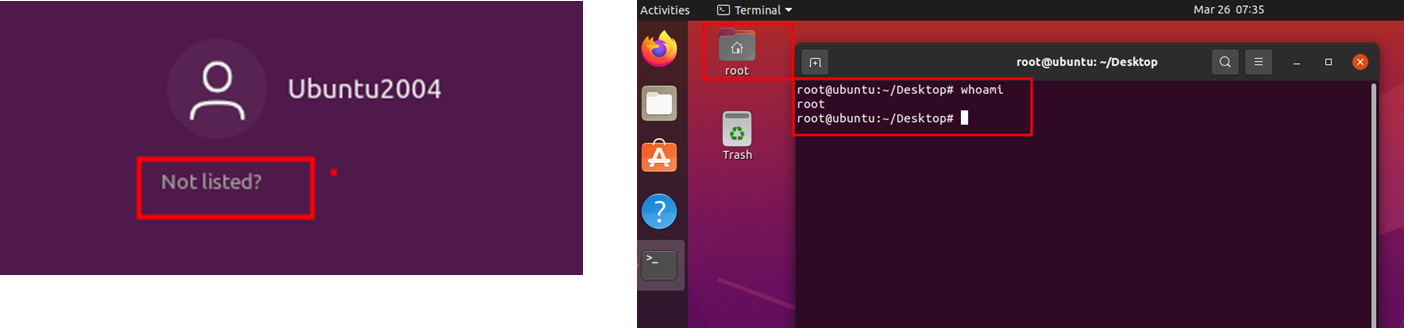
GUI 리스트에서 root 접속 활성화 하기
아래 3개의 파일을 수정 하면 gui 리스트에 root 계정 접속도 가능합니다.
주석 처리 (#) 를 해주세요.
1./etc/gdm3/custom.conf 수정
2./etc/pam.d/gdm-password
3./etc/pam.d/gdm-autologin
vi /etc/gdm3/custom.conf

# Enabling automatic login
AutomaticLoginEnable = true
AutomaticLogin = root

[security]
AllowRoot=true

vi /etc/pam.d/gdm-password
#auth   required        pam_succeed_if.so user != root quiet_success

vi /etc/pam.d/gdm-autologin
#auth   required        pam_succeed_if.so user != root quiet_success