728x90
반응형

파이참에서 프로젝트 여러 개 실행 방법

파이참 사용시 여러개 프로젝트를 동시에 띄워놓고 다른 프로젝트 코드를 보면서 작업하고 싶을때가 있습니다. 

파이참의 아래 설정을 변경해서 여러개의 프로젝트를 동시에 띄워보세요 

간단하지만 막상 찾아서 사용할때는 또 잘 안보여서 정리 차원에서 기록 합니다. 

파이참 설정 

File -> settings -> SystemSettings -> Reopen Projects on Startup -> New window 라디오 버튼 클릭 


파이참 프로 젝트 오픈 

File->open File or Project -> 실행 할 프로젝트 선택 


728x90
반응형
728x90
반응형

파이썬에서 제공하는 Matplotlib  라이브러리를 이용해 데이터를 그래프로 보여주는 예제를 소개합니다. 

Tibero에서 데이터를 가져와서 데이터를 출력하는 예제입니다. 


사전 작업 

  1. python 설치
  2. pyodbc 설치
  3. Tibero ODBC 설치 
  4. Tibero Sample Schema 생성(첨부 파일-scott.sql)
  5. pip install pyodbc
  6. pip install matplotlib

scott.sql
0.00MB

필수 라이브러리 설치

(testEnv) C:\pydev\venv>python -m pip install --upgrade pip
Collecting pip
  Using cached https://files.pythonhosted.org/packages/4d/16/0a14ca596f30316efd412a60bdfac02a7259bf8673d4d917dc60b9a21812/pip-22.0.4-py3-none-any.whl
Installing collected packages: pip
  Found existing installation: pip 19.2.3
    Uninstalling pip-19.2.3:
      Successfully uninstalled pip-19.2.3
Successfully installed pip-22.0.4

(testEnv) C:\pydev\venv>pip install pyodbc
Collecting pyodbc
  Downloading pyodbc-4.0.32-cp37-cp37m-win_amd64.whl (73 kB)
     ---------------------------------------- 73.1/73.1 KB ? eta 0:00:00
Installing collected packages: pyodbc
Successfully installed pyodbc-4.0.32


(testEnv) C:\pydev\venv> pip install matplotlib
Collecting matplotlib
  Downloading https://files.pythonhosted.org/packages/71/97/b93e7edcdf5f0321bef2c8404ca8e8401e7f1f869ba8ee986f71514ca1b3/matplotlib-3.5.1-cp37-cp37m-win_amd64.whl (7.2MB)
     |████████████████████████████████| 7.2MB 6.4MB/s
Collecting kiwisolver>=1.0.1 (from matplotlib)
  Downloading https://files.pythonhosted.org/packages/96/27/cd4bb740e363eaf9241f26ca14504c5b2603f73d6fa1e3782913c3b0b701/kiwisolver-1.4.2-cp37-cp37m-win_amd64.whl (54kB)
     |████████████████████████████████| 61kB ...


소스 코드

import pyodbc
import numpy as np
import matplotlib.pyplot as plt
db = pyodbc.connect('DSN=Tibero6;UID=tibero;PWD=tmax')
cursor = db.cursor()

cursor.execute("select trunc(count(*)) from emp")
for row in cursor:
    totalemps=int(row[0])
    print(totalemps)
t=np.arange(totalemps)
cursor.execute("select ename,sal from emp")
names=[]
salaries=[]
for row in cursor:
    names.append(row[0])
    salaries.append(row[1])
bar_width=0.5
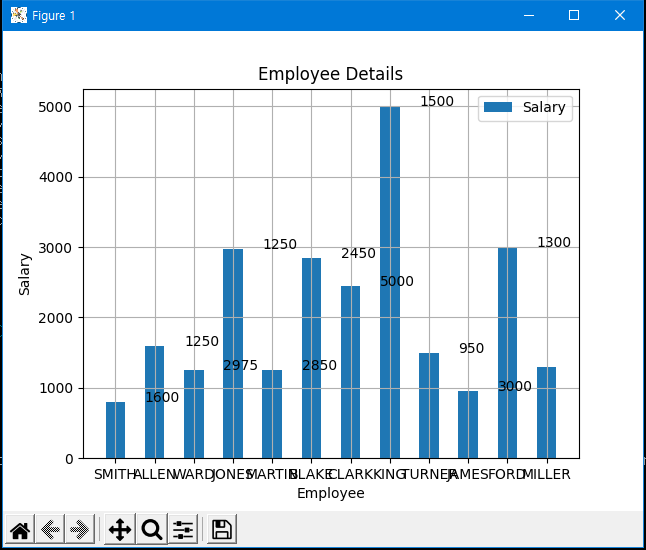
plt.bar(t,salaries,bar_width,label="Salary")
plt.title("Employee Details")
plt.xlabel("Employee")
plt.ylabel("Salary")
plt.xticks(t,names)
plt.grid(True)
plt.legend()
xs=[x for x in range(1,totalemps)]
for x,y in zip(xs,salaries):
    plt.annotate(salaries[x],(x-bar_width/2,y))
plt.show()

소스 실행

  • python matplotlib_sample.py


728x90
반응형
728x90
반응형

Python 이미지

파이썬 가상환경 왜 쓰지? 

파이썬은 현재 [2022.04.12] 기준으로 3.10 버전 까지 릴리즈가 되었습니다. 

파이썬 릴리즈 버전


버전 마다 파이썬 문법이 달라서 환경 구성을 별도로 해야 하는 경우가 종종 발생합니다. 

이럴때 python 에서 제공하는 virtualenv(venv) 기능을 사용함으로서 버전 별로 개발 환경을 달리하여 구성 할수 있습니다. 


예를 들어 각각 아래와 같은 환경에서 프로젝트가 환경이 구성되고 개발 되어질수 있습니다. 

  • app1 : venv1(파이썬 2.7 버전  + Django3.x)
  • app2 : venv2(파이썬 3.7 버전 + Django4.x )


파이썬 버전과 Django 버전별로 사용하는 팩키지(라이브러리)간 의존성으로 인해  호환이 되지 않는 문제가 종종 발생한다. 이러한 문제를 서로다른 동일한 PC 에 가상환경을 만들어 개발함으로서 문제를 해결 할수 있다 . 


virtualenv VS venv 언떤게 맞는거야? 

둘다 가상환경을 만들수 있다는 점에서 동일 하지만 사용방법및 용도에 따라서 차이가 있습니다. 

virtualenv 는 별도로 패키지를 설치해야(pip install virtualenv) 사용 가능 하다. 

Python3 버전에서는 기본제공하는 라이브러리로 Python3 버전을 사용중이라면 venv 명령을 사용해 가상환경 구성이 가능합니다. 


가상환경 생성 방법

이제 본격적으로 가상환경 생성 방법에 대해 알아 보겠습니다. 

python -m venv [가상환경이름] 명령을 통해 생성 할 수 있다. 


가상 환경 생성

우선 가상환경을 구성할 루트 디렉토리(venv) 를 만듭니다. 

그리고 해당 디렉토리로 들어가서 가상환경을 만들어 줍니다. 

파이썬 2.7 환경에 의미로 py27 가상환경 이름을 주었습니다. 

$ mkdir venv
$ cd venv
$ python -m venv py27

가상환경 생성 확인

py27 이라는 이름으로 폴더가 생기고 파이썬 관련한 파일과 디렉토리가 생겼습니다. 

하지만 파이썬 2.7 버전을 설치를 원했는데 3.7 버전으로 생성이 되었습니다.

생성시 사용자 환경 파이썬 버전으로 가상 환경이 생성이 되어 그렇습니다.

* 필자의 환경은  centos7 에 default 파이썬 2.7 환경 구성이었으나 파이썬 3.7을 별도로 설치해 주었습니다.

리눅스환경에서 파이썬 설치는 아래 글을 참고 하세요

파이썬3.7 설치 


[testuser1@centos7:/home/testuser1/venv]$ tree py27 -L 2
py27
|-- bin
|   |-- activate
|   |-- activate.csh
|   |-- activate.fish
|   |-- easy_install
|   |-- easy_install-3.7
|   |-- pip
|   |-- pip3
|   |-- pip3.7
|   |-- python -> /bin/python
|   `-- python3 -> python
|-- include
|-- lib
|   `-- python3.7
|-- lib64 -> lib
`-- pyvenv.cfg


파이선 3.7 환경에서 파이썬2.7 가상환경 생성 

python3 버전에서는 venv 로 파이썬2.7 전을 만들수 없는 것 같습니다. virtualenv  팩키지를 설치해서 가상환경을 만들어 보겠습니다. 

  •  pip install virtualenv 로 패키지를 설치합니다. 
  • virtualenv py27 --python=python2.7

원하는 파이썬2.7 버전으로 생성되는것을 확인할수 있습니다. 

[testuser1@centos7:/home/testuser1/venv]$ tree -a py27/  -L 2
py27/
|-- .gitignore
|-- bin
|   |-- activate
|   |-- activate.csh
|   |-- activate.fish
|   |-- activate.nu
|   |-- activate.ps1
|   |-- activate_this.py
|   |-- deactivate.nu
|   |-- easy_install
|   |-- easy_install-2.7
|   |-- easy_install2
|   |-- easy_install2.7
|   |-- pip
|   |-- pip-2.7
|   |-- pip2
|   |-- pip2.7
|   |-- python
|   |-- python2 -> python
|   |-- python2.7 -> python
|   |-- wheel
|   |-- wheel-2.7
|   |-- wheel2
|   `-- wheel2.7
|-- include
|   `-- python2.7 -> /usr/include/python2.7
|-- lib
|   `-- python2.7
|-- lib64
|   `-- python2.7
`-- pyvenv.cfg

7 directories, 24 files

가상환경 진입

 py27/bin/activate 실행하면 가상한경에 진입 할수 있습니다.

  • . py27/bin/activate
  • python -V 명령을 통해 설치된 버전 확인 
  • pip list 명령을 통해 설치된 버전 확인 (pip 를 통해 파이썬에서 필요로 하는 팩키지를 설치할수 있습니다.)
(py27) [testuser1@centos7:/home/testuser1/venv]$ python -V
Python 2.7.5
(py27) [testuser1@centos7:/home/testuser1/venv]$ pip --version
pip 20.3.4 from /home/testuser1/venv/py27/lib/python2.7/site-packages/pip (python 2.7)
(py27) [testuser1@centos7:/home/testuser1/venv]$ pip list
DEPRECATION: Python 2.7 reached the end of its life on January 1st, 2020. Please upgrade your Python as Python 2.7 is no longer maintained. pip 21.0 will drop support for Python 2.7 in January 2021. More details about Python 2 support in pip can be found at https://pip.pypa.io/en/latest/development/release-process/#python-2-support pip 21.0 will remove support for this functionality.
Package    Version
---------- -------
pip        20.3.4
setuptools 44.1.1
wheel      0.37.1

python2.7 환경에서 개발 할수 있는 환경을 만들어 졌습니다. 


가상환경  나오기 / 삭제 

Ctrl +D 가상환경에  빠져 나올수 있습니다. 

가상환경이 삭제는 그냥 지우시면 됩니다. (py27 ) 삭제 

728x90
반응형
728x90
반응형

파이썬 expect 스크립트 실행 

리눅스에서는 expect 스크립트 언어를 통해 ftp 나 ssh 로 접속 하여 업무를 자동화 할 수 있습니다. 

* expect
CLI 상호작용 자동화 프로그램의로 특정 명령을 수행후 정해진 응답을 기대하면서 다음 작업 처리를 대기하는 방식으로 

코드를 작성합니다. 


파이썬에서도 해당 언어와 마찬가지로 pexpect 라이브러리를 활용해 보다 다양한 업무를 자동화 할수 있습니다. 

Python 프로그램을 통해 리눅스 사용자 계정을 일괄 변경 하는 테스트를 코드를 공유 합니다. 

Python2.7 환경에서 테스트 되었습니다. 


패스워드 변경할 사용자 파일(UserList.txt )

$cat UserList.txt 
testuser1
testuser2
testuser3
testuser4
testuser5

Python 코드

#!/usr/bin/python
# -*- coding:utf-8 -*-

import sys
import pexpect  
import subprocess
import tarfile
import sys
import re
import os
import getopt
import traceback
import shutil
import sys
reload(sys)
PROMPT = ['\# ','>>> ','> ','\$ ', '\] ']

USER_LIST_FILE='UserList.txt'
ROOT_ID = 'root'

class PsshConn:

    def __init__(self , ip , id , passwd, timeout):
        self.ip = ip
        self.id = id
        self.passwd = passwd
        self.timeout = timeout

    def show(self):
        print "ip : %s " % self.ip
        print "id : %s  passwd : %s" % (self.id, self.passwd)

    def sshconn(self):
        ssh_newkey = 'Are you sure you want to continue connecting'
        conn = 'ssh %s@%s' % (self.id , self.ip)
        print "conn : " + conn
        child = pexpect.spawn(conn ,timeout=self.timeout)
        ret = child.expect([pexpect.TIMEOUT, ssh_newkey, '[P|p]assword: '] )

        if ret == 0:
            print '[-] Error Connecting : 0 '
            return
        if ret == 1:
            child.sendline('yes')
            ret = child.expect([pexpect.TIMEOUT, \
                '[P|p]assword:'])
            if ret == 0:
                print '[-] Error Connecting : 1'
                return
        child.sendline( self.passwd )
        child.expect(PROMPT)
        return child


def usage():
    print "user password change Test [options]  "
    print "-h : help"
    print "-u : User List "
    print "-i : SERVER IP "
    print "-P : Root Password "
    print "-p : User Password "
    print "ex:User List get) ./ChangePassword.py -i localhost -P test -u  "
    print "ex:Change passwd) ./changepassd.py  -i localhost -P test  -p test  "


def userList() :
    with open(USER_LIST_FILE) as f:
        lines = f.read().split()
    #for line in lines:
    #    print(line)
    return lines


def mkUserList():

    conn = PsshConn(IP_ADDRESS , ROOT_ID , ROOT_PASSWD, 60).sshconn()
    conn.sendline('export LANG=en_US.UTF-8')
    conn.expect(PROMPT)
    conn.sendline('grep /bin/bash /etc/passwd | cut -f1 -d: ')
    conn.expect(PROMPT)

    #print "RECOMAND :<< %s >>" % conn.before
    users = conn.before

    with open(USER_LIST_FILE+'_tmp','w') as wfile:
        wfile.writelines(users)
    wfile.close()
 
    #file line count
    lineCnt = len(open(USER_LIST_FILE+'_tmp','r').readlines())   
     
    with open(USER_LIST_FILE+'_tmp','r') as rfile:
        with open(USER_LIST_FILE,'w') as rwfile:
            for i, line in enumerate(rfile):
                if (i > 1) & (i < lineCnt - 1) :
                    print "User :%s" % line.replace("\n","")
                    rwfile.writelines(line)
        rwfile.close()
    rfile.close()                           
    os.remove(USER_LIST_FILE+'_tmp')


if __name__=="__main__":

    try:
        opts, args = getopt.getopt(sys.argv[1:],"i:P:p:hu")

    except IOError as e:
        usage()
        print ("[-] Error : "  + e)
        sys.exit(2)


    for o, a in opts:
        if o == "-h":
            print "======= options ========"
            usage()
            sys.exit(0)
        elif o == "-i":
            IP_ADDRESS = a
            print 'IP: %s' % [ IP_ADDRESS ]      
        elif o == "-P":
            ROOT_PASSWD = a
            print 'ROOT_PASSWD : %s' % [ ROOT_PASSWD ]
        elif o == "-p":
            USER_PASSWD = a
            print 'USER_PASSWD : %s' % [ USER_PASSWD ]
        elif o == "-u":
            mkUserList()
            print '[User List Search]'    
            sys.exit(0)             

    try:
        print " ==== change password  ==== "

        try:
            ssh = PsshConn(IP_ADDRESS , ROOT_ID , ROOT_PASSWD,60).sshconn()
            ssh.sendline('cd ')
            ssh.sendline('export LANG=en_US.UTF-8')

            for user in userList():
                print "USER : %s" % user
                ssh.sendline('passwd ' + user )
                ssh.expect("password:")
                ssh.sendline(USER_PASSWD )
                ssh.expect("password:")
                ssh.sendline(USER_PASSWD )
                ssh.expect(PROMPT)
        except Exception ,e:
             print "[-] Error       : %s " % e

    except Exception, e:
        exc_type, exc_value, exc_traceback = sys.exc_info()
        print "[-] Error       : %s " % e
        print "[-] line number :  " , exc_traceback.tb_lineno

실행

  • UserList.txt 파일에 등록된 testuser1~testuser5 까지 test 패스워드로 일괄 변경 합니다. 
  • 변경된 패스워드로(test) 로 변경 되었는지 확인하기 위해 SSH 로 접속 테스트를 진행 합니다.

728x90
반응형
728x90
반응형

Centos7 설치시 파이썬 버전은 Python 2.7 버전이  Default 설치 됩니다. 

Python3.7 버전 설치 하는 방법에 대해 알아 보겠습니다. 


파이썬 다운로드

아래 ftp 경로에 파이썬 여러버전이 업로드 되어 있습니다. 

사용하고자 하는 버전을 확인 합니다. 

https://www.python.org/ftp/python/


Index of /ftp/python/


www.python.org


#설치 경로 이동 
cd /usr/src/

#파이썬 다운로드 
wget https://www.python.org/ftp/python/3.7.1/Python-3.7.1.tgz

#파이썬 압축해제

필수 팩키지 리스트

#필수 설치 팩키지 확인
yum list gcc openssl-devel bzip2-devel libffi-devel

#필수 팩키지 설치 
yum install -y list gcc openssl-devel bzip2-devel libffi-devel

파이썬 설치

 #파이썬 경로 이동 
 cd Python-3.7.1/
 
#파이썬 환경 설정 
 ./configure --enable-optimizations

#설치
make altinstall
  • 정상설치 확인
Looking in links: /tmp/tmp6l2a8r7l
Collecting setuptools
Collecting pip
Installing collected packages: setuptools, pip
Successfully installed pip-10.0.1 setuptools-39.0.1
[root@centos7:/usr/src/Python-3.7.1]$ 


파이썬 버전 및 python3.7 환경 설정

설치 후 버전 확인을 하면 여전히 2.7 버전으로 표기 됩니다. 

링크 생성후 범용 적으로 사용 하도록 설정해 줍니다. 


[root@centos7:/usr/src/Python-3.7.1]$ python -V
Python 2.7.5
[root@centos7:/usr/src/Python-3.7.1]$ /usr/src/Python-3.7.1/python -V
Python 3.7.1
#bin 경로 이동 
cd /usr/bin
#링크 생성 
ln -s /usr/src/Python-3.7.1/python python3

#profile alias 설정
vi /etc/profile

alias python="python3"

#profile 적용 
. /etc/profile
  • 환경 설정 변경후 설치 버전 재 확인 
[root@centos7:/root]$ python -V
Python 3.7.1


728x90
반응형
728x90
반응형

파이썬 메일 보내는 방법 

파이썬에서 메일 보내는 방법에 대한 코드 공유입니다. 

리눅스에 설치된 SendMail 서버를 통해 첨부 파일과 함께 메일을 보내는 예제입니다. 

코드양은 많지 않아 별도로 설명 하지는 않습니다. 


조금씩 수정해 보면서 사용자 용도에 맞게 변경해서 적용해 보세요

Python STMT Mail Send 코드

  • python2.7 환경에서 작성되었습니다. 
  • 메일주소는 테스트할 주소에 맞게 수정해서 테스트하세요 
  • 메일서버 구성은 해당 글을 참고 하세요 
#!/usr/bin/python
# -*- coding:utf-8 -*-

import sys
import sys
reload(sys)
sys.setdefaultencoding("utf-8")
import smtplib
from email.mime.text import MIMEText
from email.mime.base import MIMEBase
from email.mime.multipart import MIMEMultipart
from email.header import Header
from email.encoders import encode_base64
from email import Utils
from email import Encoders 
import os

sys.setdefaultencoding("utf-8")

STMT_HOST='localhost'
PORT = 25

COMMASPACE = ", "
class StmtMail:
    def __init__(self):
        self.stmt_host = STMT_HOST
        self.port = PORT
        self.from_user = ''
        self.to_user = ''

    def sendmail(self,from_user, to_user, cc_users, subject, contents, attach):
        
        try:
            print " Mail Send "        
            msg = MIMEMultipart()
            #msg = MIMEMultipart("alternative")
            msg["From"] = from_user
            msg["To"] = to_user
            msg["Cc"] = COMMASPACE.join(cc_users)
            msg["Subject"] = Header(s=subject, charset="utf-8")
            msg["Date"] = Utils.formatdate(localtime = 1)
            msg.attach(MIMEText(contents, "html", _charset="utf-8"))
        
            if (attach != None):
                    part = MIMEBase("application", "octet-stream" ,charset="utf8")
                    part.set_payload(open(attach, "rb").read())
                    Encoders.encode_base64(part)
                    part.add_header("Content-Disposition", 'attachment; filename="%s"' % os.path.basename(attach))
                    msg.attach(part)

            smtp = smtplib.SMTP(self.stmt_host, self.port)
            smtp.sendmail(from_user, cc_users, msg.as_string())
            smtp.close()
        except Exception, e:
            exc_type, exc_value, exc_traceback = sys.exc_info()
            print "[-] Error       : %s " % e
            print "[-] line number :  " , exc_traceback.tb_lineno


if __name__=="__main__":

    try:
        print " Mail Send "
        stmtmail = StmtMail()
        stmtmail.sendmail("example@co.kr", "example@co.kr", ["example@co.kr"] \
                , "Python Send Mail Test " \
                , "TEST MAIL" \
                , None) 

    except Exception, e:
        exc_type, exc_value, exc_traceback = sys.exc_info()
        print "[-] Error       : %s " % e
        print "[-] line number :  " , exc_traceback.tb_lineno


테스트 결과 

  • sendmail.py 실행
(py27) [pythontest@centos7:/home/pythontest/venv/py27/test]$ python sendmail.py 
 Mail Send 
 Mail Send 

스팸 메일로 정상적으로 메일이 전송되었습니다. 

728x90
반응형

+ Recent posts