1. GitLab Runner란
GitLab이 오케스트라의 '지휘자'라면, GitLab Runner는 지휘자의 악보(.gitlab-ci.yml)를 보고 실제로 악기를 연주하는 '작업자(일꾼)'입니다.
개발자가 코드를 GitLab 서버에 Push하면, GitLab은 조건에 맞는 Runner에게 알림을 보냅니다. Runner는 지정된 서버에서 코드를 임시로 내려받아 빌드, 테스트, 배포 등의 스크립트를 대신 실행해 주는 핵심 프로그램이다.
2. CI/CD 파이프라인 스크립트 작성 (Gitlab 서버: .gitlab-ci.yml)
Runner가 수행할 작업 지시서입니다. 프로젝트 최상위 경로에 위치해야 합니다.
핵심 개념 및 스크립트 예시
- 태그(tags): 특정 Runner를 지정하여 실행하도록 연결하는 고리입니다. 웹 설정과 정확히 일치해야 합니다.
- 임시 디렉토리: Runner는 매번 $CI_PROJECT_DIR라는 임시 폴더(예: /home/qadoc/builds/...)에 최신 코드를 다운로드(HEAD 분리 상태)하여 작업을 수행합니다.
3. GitLab Runner 설치 방법 (Rocky Linux 9 / RHEL 계열)
터미널에서 root 권한 또는 sudo 명령어를 사용하여 공식 저장소를 등록하고 패키지를 설치합니다.
- 공식 GitLab Runner 저장소(Repository) 추가
curl -L "https://packages.gitlab.com/install/repositories/runner/gitlab-runner/script.rpm.sh" | sudo bash- dnf 명령어로 패키지 설치
sudo dnf install gitlab-runner -y- 서비스 자동 시작 설정 및 상태 확인
- 설치가 완료되면 서버가 부팅될 때 자동으로 Runner가 켜지도록 설정합니다.
# 서비스 활성화 및 시작
sudo systemctl enable --now gitlab-runner

# 서비스 상태 확인 (active (running) 상태인지 확인)
sudo systemctl status gitlab-runner
4.GitLab Runner 등록 및 연동
- 설치된 일꾼(Runner)에게 "어떤 GitLab 서버에 가서 일을 받아와야 하는지" 주소와 인증 번호(토큰)를 알려주는 과정입니다.
4.1 GitLab 웹에서 '새로운 토큰' 발급받기
- GitLab 프로젝트 웹 화면 이동 ➔ 왼쪽 메뉴 Settings (설정) > CI/CD > Runners 클릭 후 펼치기.

- [New project runner] 버튼을 클릭하여 새로운 러너 생성 화면으로 이동.
- 태그(Tags) 입력란에 mkdocs를 입력하고 생성 버튼을 누르면 화면에 새로운 인증 토큰(glrt-... 형태)이 나타납니다.
- tags 는 .gitlab-ci.yml 에서 설정해서 사용 하는 태그명과 일치 해야 합니다.(매우중요)

Gitlab Runner 가 정상적으로 생성이 되면 Gtilab runner 를 설치한 서버에서 Gitlab runner 를 등록 해 줘야 한다.

4.2 gitlab runner 등록 및 실행
- 아래내용은 2개의 runner 등록 하고 실행 하는 예제입니다.
4.2.1 Gitlab UI 화면 에서 runner 생성
 |
 |
- test 용으로 gitlab 에서 각각 test1, test2 태그를 사용 하는 gitlab runner 를 생성 합니다.
4.2.2 Gitlab UI 생성한 Runner 를 서버에 등록 (test1,test2 )
- 등록한 runner 를 실행 하기위해 runner 를 실행하려는 서버에서 실행 합니다.
# 두 번째 러너 등록 (새로운 토큰 사용)
sudo gitlab-runner register \
  --url "http://[gitlab ip]:9080" \
  --token "새로_발급받은_첫번째_토큰" \
  --executor "shell"


  # 두 번째 러너 등록 (새로운 토큰 사용)
sudo gitlab-runner register \
  --url "http://[gitlab ip]:9080" \
  --token "새로_발급받은_두번째_토큰" \
  --executor "shell"
- 두개의 runner 가 정상적으로 등록이 완료 되면 /etc/gitlab-runner/config.toml 파일에 [[runners]] 블럭이 두개가 실행이됩니다.
concurrent = 1 // 한번에 1개의 작업을 동시에 처리 할수 있도록 허용 4 이면 4개 동시 작업
check_interval = 0
connection_max_age = "15m0s"
shutdown_timeout = 0

[session_server]
  session_timeout = 1800

[[runners]]
  name = "rocky9"
  url = "http://[ip]:9820"
  id = 5
  token = "glrt-[첫번째토큰]"
  token_obtained_at = 2026-06-01T09:32:47Z
  token_expires_at = 0001-01-01T00:00:00Z
  executor = "shell"

[[runners]]
  name = "rocky9"
  url = "http://[ip]:9820"
  id = 6
  token = "glrt-[두번째토큰]"
  token_obtained_at = 2026-06-01T09:33:05Z
  token_expires_at = 0001-01-01T00:00:00Z
  executor = "shell"
4.2.3 Gitlab runner 실행 실행 및 상태 확인
#실행
sudo systemctl start gitlab-runner

#상태 확인
sudo systemctl status gitlab-runner

4.2.4 Gitlab pipelined 스크립트 작성 (.gitlab-ci.yml)
- .gitlab-ci.yml 파일은 프로젝트 최 상단 경로에 생성 합니다.
- gitlab 에 등록된 프로젝트 변경 사항이 감지 되면 작성된 스크립트에 따라 작업을 수행 합니다.
- build_job 에서는 test1 태그로 등록 한 잡이 실행 되고 deploy_job 에서는 test2 태그로 등록 한 잡이 실행 됩니다.
# 전체 작업 순서 정의
stages:
  - build
  - deploy

# [첫 번째 작업] test1 runner
build_job:
  stage: build
  tags:
    - test1   # ⭐ 1번 러너 수행
  script:
    - rm -rf $HOME/gitlab-test-runner ;mkdir -p $HOME/gitlab-test-runner
    # 1. 파일에 내용 쓰기 (전체를 작은따옴표로 묶어서 YAML 에러 방지)
    - 'echo "$(date) : test1 runner execution" >  $HOME/gitlab-test-runner/runner-test.txt'

  # ⭐ 핵심: 이 파일은 다음 stage로 전달해 달라고 GitLab에 요청
  artifacts:
    paths:
      - runner-test.txt

# [두 번째 작업] test2 runner
deploy_job:
  stage: deploy
  tags:
    - test2   # ⭐ 2번 러너 수행
  script:
    # 여기도 마찬가지로 전체를 작은따옴표로 묶어줍니다.
    - 'echo "$(date) : test2 runner execution" >>  $HOME/gitlab-test-runner/runner-test.txt'
    - cat $HOME/gitlab-test-runner/runner-test.txt
4.2.5 Gitlab Build 상태 확인
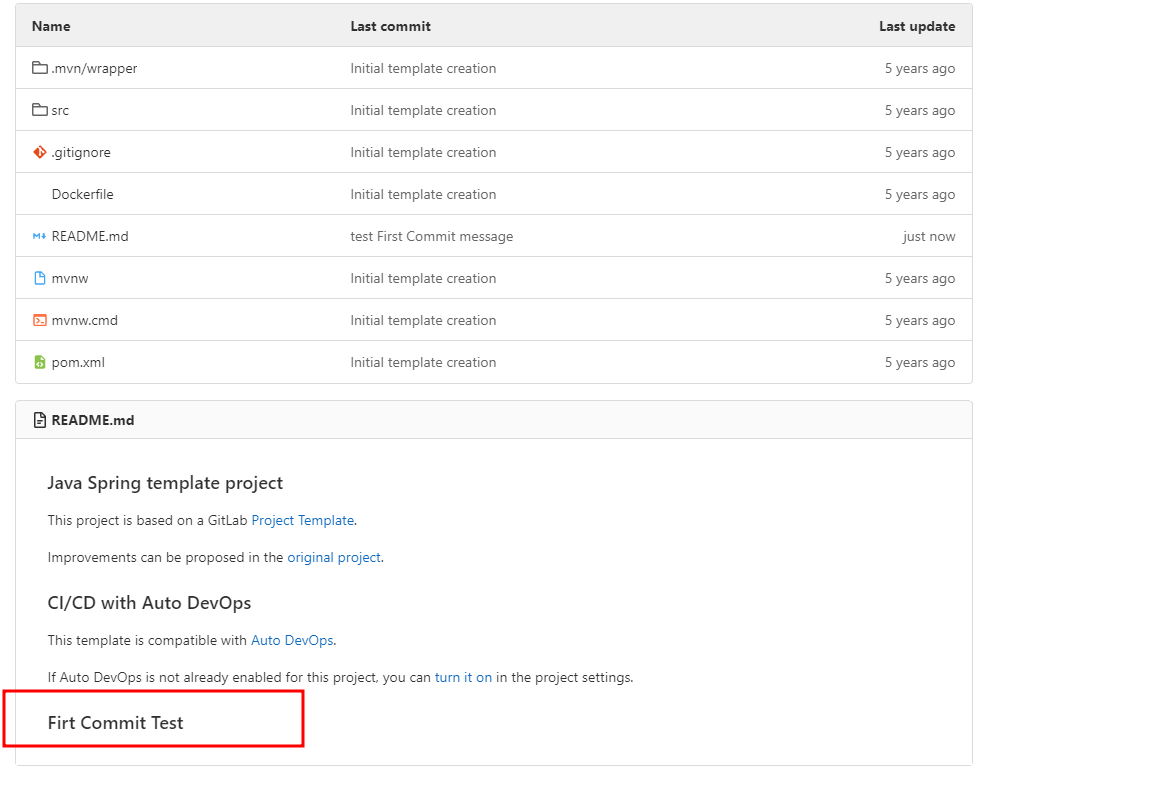
- 정상동작이 된다면 아래 그림 처럼 순차적으로 job 이 수행이 됩니다.


- 수행이 완료되면 스크립트가 수행 되고 예상되는 결과에 따라 아래 처럼 파일이 생성 되고 파일에 실행된 시간을 기록 하고 종료합니다.
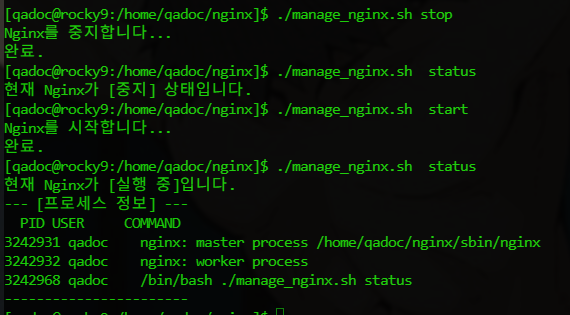
4.2.5.GitLab Runner 서비스 제어 기타 명령어
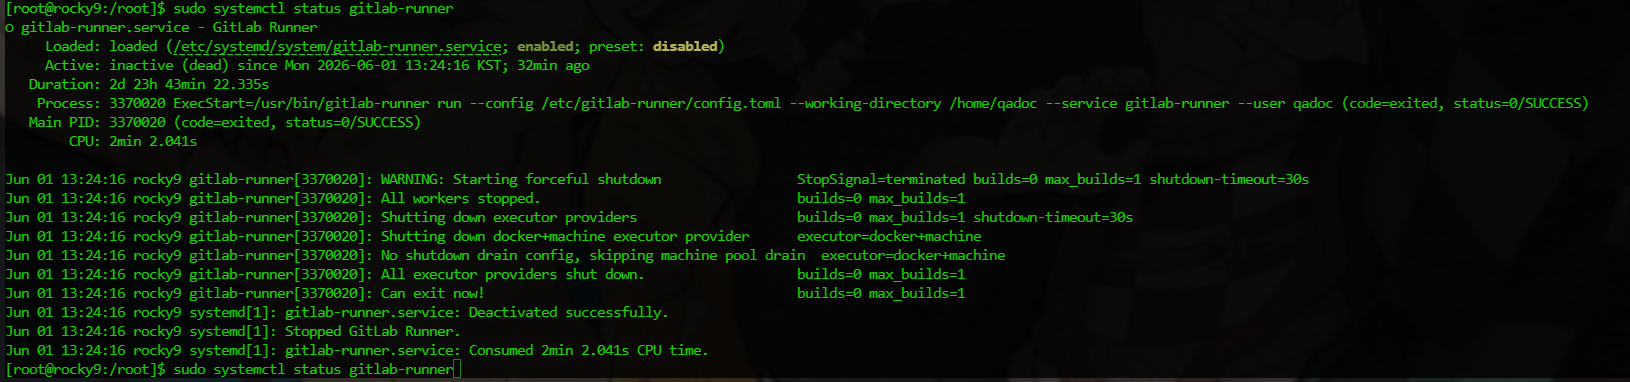
1. 러너 상태 확인 (Status) 러너가 현재 잘 켜져 있는지, 꺼져 있는지 가장 먼저 점검할 때 사용합니다.
sudo systemctl status gitlab-runner확인 팁: 결과 화면에 초록색으로 active (running)이 뜨면 정상, inactive (dead)나 failed가 뜨면 꺼져있는 상태입니다. (화면에서 빠져나오려면 q를 누르세요.)
2. 러너 시작 (Start) 꺼져 있는 러너 서비스를 켭니다.
sudo systemctl start gitlab-runner
3. 러너 중지 (Stop) 서버 점검이나 러너 동작을 아예 멈추고 싶을 때 사용합니다. (진행 중이던 배포 작업이 있다면 실패 처리될 수 있으므로 작업이 없을 때 수행하세요.)
sudo systemctl stop gitlab-runner
4. 러너 재시작 (Restart) ⭐️ 러너를 껐다가 바로 다시 켭니다. 에러가 났을 때 가장 먼저 시도해 볼 만한 응급처치이며, 특히 관리자가 러너 설정 파일(/etc/gitlab-runner/config.toml)을 직접 수정했을 때 변경 사항을 적용하기 위해 반드시 쳐야 하는 명령어입
sudo systemctl restart gitlab-runner
5. 서버 부팅 시 자동 시작 켜기 (Enable) 리눅스 서버가 재부팅되었을 때, 관리자가 일일이 켜주지 않아도 GitLab Runner가 알아서 백그라운드에서 실행되도록 예약합니다. (설치 시 기본적으로 켜져 있습니다.)
sudo systemctl enable gitlab-runner
6. 서버 부팅 시 자동 시작 끄기 (Disable) 서버가 켜질 때 러너가 자동으로 켜지는 것을 막습니다.
sudo systemctl disable gitlab-runner
'04.DevTools > Git&GitLab' 카테고리의 다른 글
| Gitlab Upgrade 하기 (3) | 2025.07.30 |
|---|---|
| [GitLab] Project 삭제 방법 (0) | 2024.11.07 |
| [GitLab] git 빈 디렉토리 커밋 하는 방법 (0) | 2024.09.13 |
| [GitLab] Gitlab 명령어 모음 (0) | 2022.04.17 |
| [GitLab] 프로젝트 생성 및 관리 (0) | 2022.04.17 |