728x90
반응형

Nexus 란?
라이브러리 사설 Repository 이며 Maven Repository 와 유사 소스코드 관리 하는 Git 이나 Svn 과는 달리 라이브러리 버전 관리 및 배포를 담당한다.
Nexus 계정 생성
- 먼저 nexus 계정 생합니다.
[root@centos7:/root]$ adduser nexus
[root@centos7:/root]$ passwd nexus
nexus 사용자의 비밀 번호 변경 중
새 암호:
새 암호 재입력:
passwd: 모든 인증 토큰이 성공적으로 업데이트 되었습니다.
[root@centos7:/root]$ passwd nexus
nexus 사용자의 비밀 번호 변경 중
새 암호:
새 암호 재입력:
passwd: 모든 인증 토큰이 성공적으로 업데이트 되었습니다.
- nexus 계정 root 권한 부여(/etc/sudoers)
/etc/sudoers 파일을 수정권한이 없기 때문에 파일 수정 권한 변경후 수정해야 합니다.
수정 이후에는 다시 권한을 해제해 주세요
- chmod u+w /etc/sudoers
- vi /etc/sudoers
- chmod u-w /etc/sudoers
## Allow root to run any commands anywhere
root ALL=(ALL) ALL
oracle-docker ALL=(ALL) ALL
nexus ALL=(ALL) ALL
root ALL=(ALL) ALL
oracle-docker ALL=(ALL) ALL
nexus ALL=(ALL) ALL
Nexus 바이너리 설치 및 다운로드
- nexus 계정 접속후 다운로드 받은 압축파일 해제
#nexus 계정 접속
su - nexus

#바이너리 다운로드
wget http://www.sonatype.org/downloads/nexus-latest-bundle.tar.gz --no-check-certificate

#압축해제
tar xvzf nexus-latest-bundle.tar.gz
Nexus 서비스 등록 설정
cd nexus-2.15.1-02/bin

vi /etc/init.d/nexus

NEXUS_HOME="/home/nexus/nexus-2.15.1-02"

RUN_AS_USER=nexus
PIDDIR="/home/nexus"

cp nexus /etc/init.d/nexus
Nexus 서비스 시작
- service nexus start
[nexus@centos7:/home/nexus/nexus-2.15.1-02/bin]$ service nexus start
Starting Nexus OSS...
Started Nexus OSS.
Starting Nexus OSS...
Started Nexus OSS.
- 서비스 정상 부팅 확인
- ps -ef | grep nexus | grep -v grep
- netstat -tnlp | grep java

Nexus 웹 접속
- http://[서버 IP]:8081/nexus
- 최초 비밀번호는 admin/admin123 입니다.


Nexus User 생성
- Security -> Users -> add 버튼 클릭후 유저 정보 입력
- 유저 정보 하단 Role Management ->add 버튼 클릭 후 롤 선택후 유저 생성

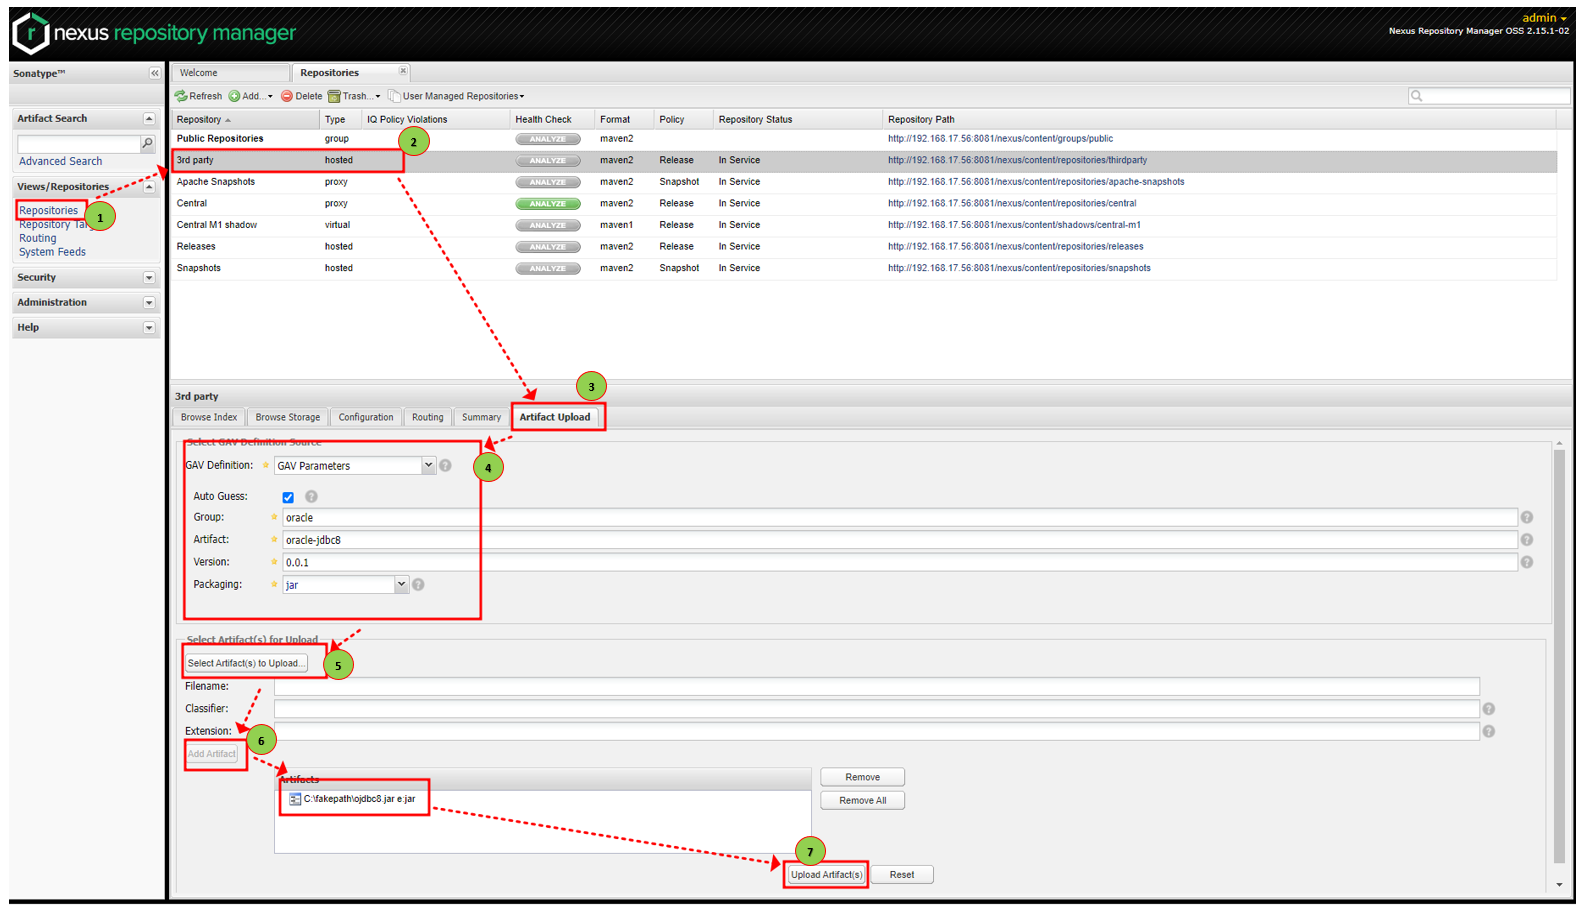
Nexus 라이브러리 업로드
- 오라클 jdbc 바이너리를 업로드 하는 방법에 대해 알아보겠습니다.
- views/ Repositories 메뉴-> Repositories -> 3rd party -> Artifact upload 버튼 클릭
- 업로드 할 라이브러리 선택(ojdbc8.jar) 후 Add Artifact 클릭
- upload Artifact(s) 선택 하면 ojdbc8.jar 가 업로드 됩니다.
Nexus 라이브러리 Maven xml 정보 확인
업로드가 완료되면 Browse Index 창에서 업로드된 라이브러리를 확인 할 수 있으며
pom.xml 에 작성할 xml 정보를 확인할수 있습니다.

이클립스 Nexus 설정
이클립스에서 nexus 레파지토리 정보를 입력해 줍니다.
설정 파일은 setting.xml 파일이며 이클립스 Preferences 창을 열어
User Settings 을 선택후 아래 내용을 작성합니다.
setting.xml 수정
<setting.xml >
<settings xmlns="http://maven.apache.org/SETTINGS/1.0.0"
  xmlns:xsi="http://www.w3.org/2001/XMLSchema-instance"
  xsi:schemaLocation="http://maven.apache.org/SETTINGS/1.0.0
http://maven.apache.org/xsd/settings-1.0.0.xsd">
<servers>
    <server>
        <id>thirdparty</id>
        <username>admin</username>
        <password>admin123</password>
    </server>
</servers>
</settings>

2.pom.xml 수정
<distributionManagement>
  <repository>
    <id>thirdparty</id>
    <url>http://xxx.xxx.xxx.xxx:8081/nexus/content/repositories/thirdparty</url>
  </repository>
</distributionManagement>
레파지 토리 정보는 nexus 레파지토리에서 Summary 항목에서 확인 하실수 있습니다.

이상 이클립에서 nexus 레파지토리에 등록된 라이브러리 사용 방법에 대해 알아 보았습니다.
728x90
반응형
'04.DevTools' 카테고리의 다른 글
| [Jenkins] docker compose Jenkins Install 가이드 (1) | 2025.09.22 |
|---|---|
| [SVN] SVN 사용법 (0) | 2024.11.14 |
| [IntelliJ] Intellij Gitlab 연동 (0) | 2024.08.16 |