728x90
반응형
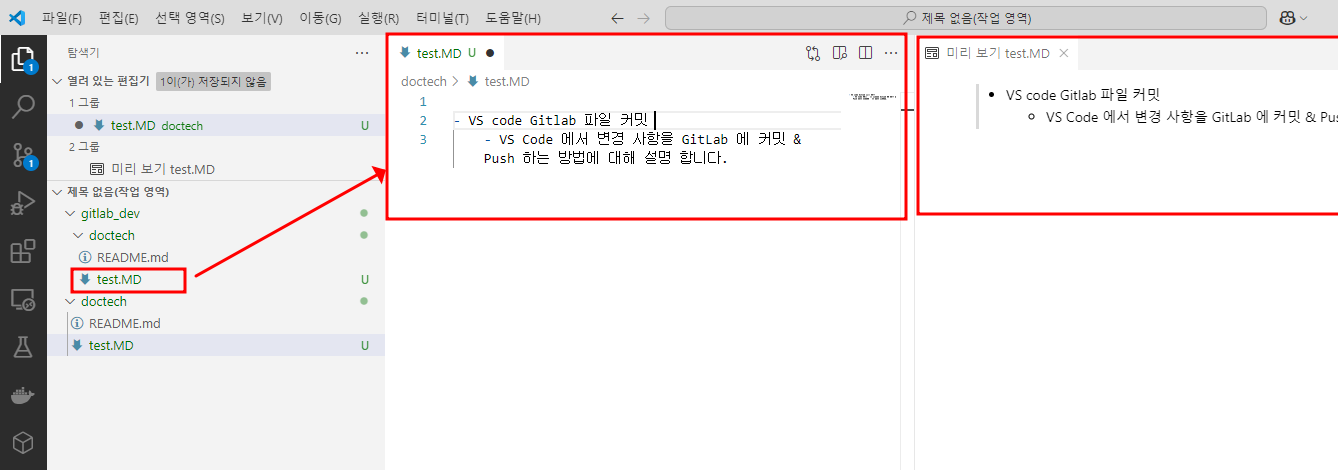
Podman Registry 설정 방법
기본 레지스트리 지정 방법
- 설정 파일 : /etc/containers/registries.conf
- 등록 방법 :unqualified-search-registries
unqualified-search-registries = ["docker.io", "quay.io", "registry.fedoraproject.org"]
- 사용자 지정 프라이빗 레지스트리 등록 방법 : [[registry]]
[[registry]]
location = "myregistry.example.com"
insecure = false
- location : 사용할 레지스트리 주소
- insecure = false : HTTPS(보안 연결) 사용 (기본값)
- insecure = true : HTTP(보안 미사용) 허용 (사내 레지스트리에서 필요할 수 있음)
podman 설정 적용
- 버전 정보 확인
podman version

podman compose version
$ podman version
Client: Podman Engine
Version: 5.2.2
API Version: 5.2.2
Go Version: go1.22.7 (Red Hat 1.22.7-2.el9_5)
Built: Tue Nov 12 21:34:59 2024
OS/Arch: linux/amd64
$ podman compose version
>>>> Executing external compose provider "/hdd/syma8/.local/bin/podman-compose". Please see podman-compose(1) for how to disable this message. <<<<
podman-compose version 1.3.0
podman version 5.2.2
- podman 재시작
systemctl restart podman
podman 기본 사용 명령어
- podman image 삭제 방법
#실행 중인 것 포함하여 모든 컨테이너 정리
podman stop -a
#컨테이너 삭제
podman rm -a
#podman 사용 이미지 삭제
podman rmi -a

#모든 pod 삭제
podman pod rm -a

#캐시 및 네트워크 데이터도 정리
podman system prune -a
podman error 조치 가이드
- 현상:
- level=error msg="failed to move the rootless netns pasta process to the systemd user.slice: dial unix /run/user/0/bus: connect: permission denied"
- rootless 환경에서 Podman을 실행 중인데, DBus 및 systemd 관련 문제가 있어 발생 하는 문제
[pod_svc] | time="2025-02-21T15:41:15+09:00" level=error msg="failed to move the rootless netns pasta process to the systemd user.slice: dial unix /run/user/0/bus: connect: permission denied"
[pod_svc] | [WARN netavark::dns::aardvark] Failed to delete aardvark-dns entries after failed start: failed to get aardvark pid: IO error: No such file or directory (os error 2)
[pod_svc] | time="2025-02-21T15:41:15+09:00" level=error msg="Removing timer for container e2d4353bc33469927b0a0a41092a5f89f8c11f2dd1e58c7ea43c14ce3c47277f healthcheck: unable to get systemd connection to remove healthchecks: lstat /tmp/storage-run-1014/systemd: no such file or directory"
[pod_svc] | Error: unable to start container e2d4353bc33469927b0a0a41092a5f89f8c11f2dd1e58c7ea43c14ce3c47277f: netavark: IO error: Error while applying dns entries: IO error: aardvark-dns failed to start: Failed to connect to bus: No such file or directory
- 조치
- Linger=yes 설정 확인
whoami
id
loginctl show-user $(whoami)
loginctl enable-linger $(whoami)- DBus 및 systemd user session 문제 해결
- 모든 네트워크 및 DNS 설정 삭제 & Podman 시스템 전체 초기화
rm -rf ~/.config/containers/aardvark-dns
rm -rf ~/.local/share/containers/networks

podman system reset
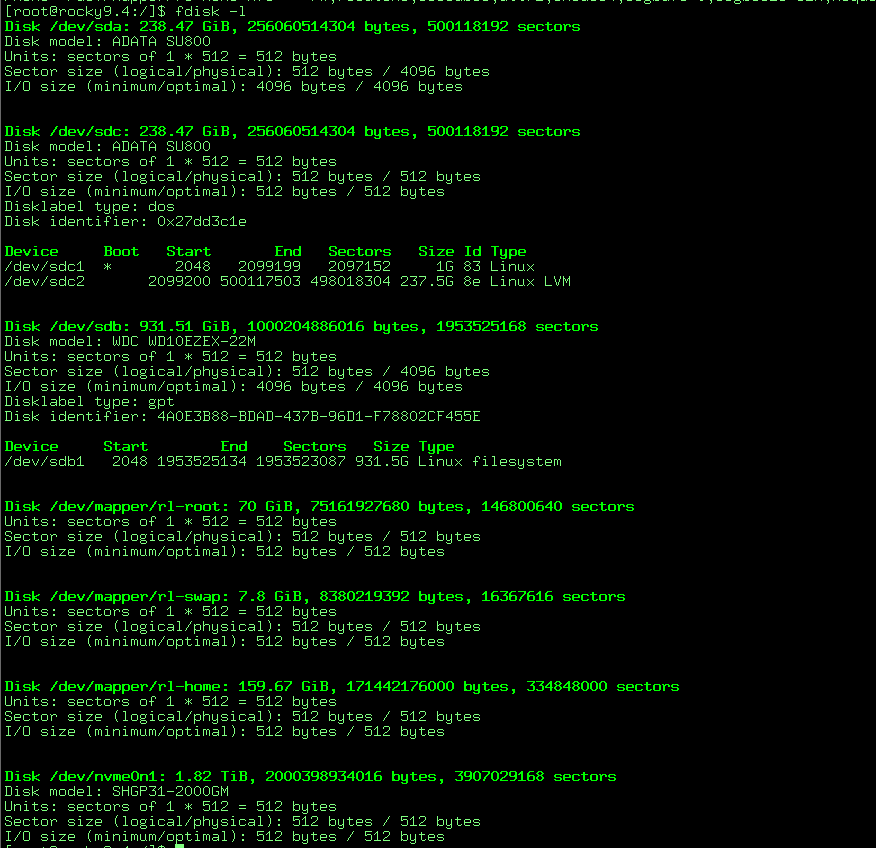
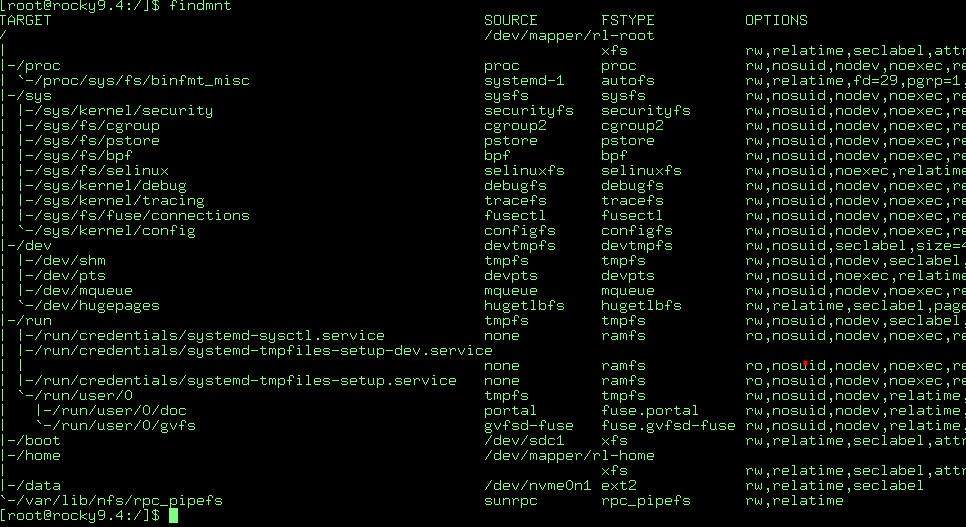
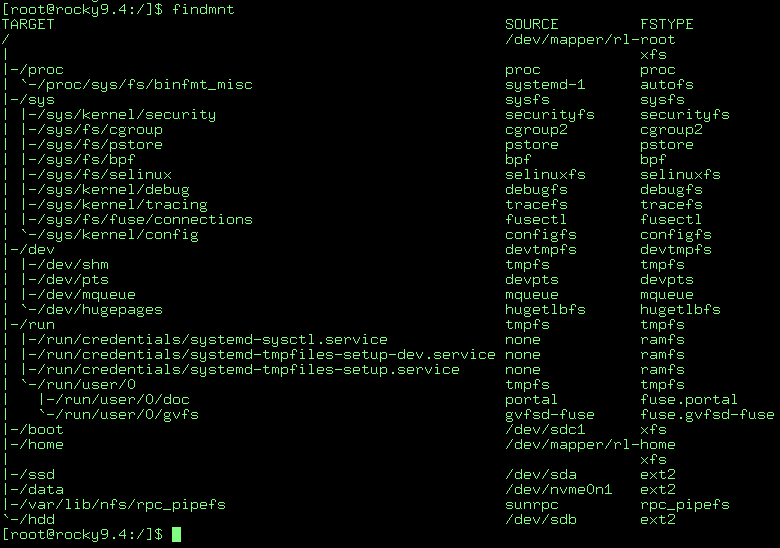
Podman의 스토리지 경로를 변경
- 현재 podman 스토리지 설정 경로 확인 및 변경
mkdir /nvme/podman_storage/run
mkdir /nvme/podman_storage/lib

vi /etc/containers/storage.conf

[storage]
driver = "overlay"

# Temporary storage location
#runroot = "/run/containers/storage"
runroot = "/nvme/podman_storage/run"

#graphroot = "/var/lib/containers/storage"
graphroot = "/nvme/podman_storage/lib"


sudo systemctl stop podman
sudo mv /var/lib/containers/storage /nvme/podman_storage/lib
sudo mv /var/run/containers/storage /nvme/podman_storage/run
sudo systemctl start podman
728x90
반응형
'02.Docker & Podman > Podman' 카테고리의 다른 글
| [podman] podman 에러 발생 및 해결 방법 (0) | 2025.04.02 |
|---|