이전글에서 Centos7.9 환경에서 Zabbix 5.0 설치를 진행 했습니다.
이번 글은 Rocky 9.4 환경에서 Zabbix 6.0 설치 하는 방법에 대해 소개합니다.
환경구성
- Zabbix Server 설치
- Rocky Linux release 9.4 (Blue Onyx)
- PostgreSQL 15.7
zabbix_server: /usr/pgsql-14/lib/libpq.so.5: no version information available (required by zabbix_server)
zabbix_server (Zabbix) 6.0.30
Revision 680df722d6b 21 May 2024, compilation time: May 21 2024 00:00:00
Copyright (C) 2024 Zabbix SIA
License GPLv2+: GNU GPL version 2 or later <https://www.gnu.org/licenses/>.
This is free software: you are free to change and redistribute it according to
the license. There is NO WARRANTY, to the extent permitted by law.
This product includes software developed by the OpenSSL Project
for use in the OpenSSL Toolkit (http://www.openssl.org/).
Compiled with OpenSSL 3.0.7 1 Nov 2022
Running with OpenSSL 3.0.7 1 Nov 2022
- Zabbix Agent 설치
- Red Hat Enterprise Linux release 9.2 (Plow)
- Red Hat Enterprise Linux release 8.7 (Ootpa)
- Rocky Linux release 8.9 (Green Obsidian)
- CentOS Linux release 7.9.2009 (Core)
Zabbix 설치
- Zabbix 버전은 6.0 LTS 버전 + PostgreSQL 15 버전을설치하여 진행 합니다.
Zabbix 서버 설치
- Rocky Linux release 9.4 에Zabbix 6.0 LTS 버전을 설치 합니다.
- 설치는 아래 홈페이지의 Zabbix Intall 가이드를 바탕으로 설치합니다.
Download and install Zabbix
www.zabbix.com

- Zabbix repository 설정
- /etc/yum.repos.d/epel.repo 수정
- excludepkgs=zabbix*
[epel]
name=Extra Packages for Enterprise Linux $releasever - $basearch
# It is much more secure to use the metalink, but if you wish to use a local mirror
# place its address here.
#baseurl=https://download.example/pub/epel/$releasever/Everything/$basearch/
metalink=https://mirrors.fedoraproject.org/metalink?repo=epel-$releasever&arch=$basearch&infra=$infra&content=$contentdir
enabled=1
gpgcheck=1
countme=1
gpgkey=file:///etc/pki/rpm-gpg/RPM-GPG-KEY-EPEL-$releasever
excludepkgs=zabbix*
- zabbix repository 설치
rpm -Uvh https://repo.zabbix.com/zabbix/6.0/rhel/9/x86_64/zabbix-release-6.0-4.el9.noarch.rpm
dnf clean allhttps://repo.zabbix.com/zabbix/6.0/rhel/9/x86_64/zabbix-release-6.0-4.el9.noarch.rpm(을)를 복구합니다
경고: /var/tmp/rpm-tmp.w2R0RU: Header V4 RSA/SHA512 Signature, key ID 08efa7dd: NOKEY
Verifying... ################################# [100%]
준비 중... ################################# [100%]
Updating / installing...
1:zabbix-release-6.0-4.el9 ################################# [100%]
# dnf clean all
43 파일이 삭제되었습니다
- Zabbix server, frontend, agent 설치
dnf install zabbix-server-pgsql zabbix-web-pgsql zabbix-apache-conf zabbix-sql-scripts zabbix-selinux-policy zabbix-agent
Extra Packages for Enterprise Linux 9 - x86_64 8.5 MB/s | 21 MB 00:02
Extra Packages for Enterprise Linux 9 openh264 (From Cisco) - x86_64 399 B/s | 2.5 kB 00:06
Rocky Linux 9 - BaseOS 1.8 MB/s | 2.2 MB 00:01
Rocky Linux 9 - AppStream 6.0 MB/s | 7.9 MB 00:01
Rocky Linux 9 - Extras 21 kB/s | 15 kB 00:00
Zabbix Official Repository - x86_64 197 kB/s | 344 kB 00:01
Zabbix Official Repository (non-supported) - x86_64 839 B/s | 1.1 kB 00:01
Zabbix Official Repository (Agent2 Plugins) - x86_64 1.3 kB/s | 1.6 kB 00:01
종속성이 해결되었습니다.
.......................
................
...........
설치되었습니다:
OpenIPMI-libs-2.0.32-3.el9.x86_64 apr-1.7.0-12.el9_3.x86_64 apr-util-1.6.1-23.el9.x86_64
apr-util-bdb-1.6.1-23.el9.x86_64 apr-util-openssl-1.6.1-23.el9.x86_64 fping-5.1-1.el9.x86_64
httpd-2.4.57-8.el9.x86_64 httpd-core-2.4.57-8.el9.x86_64 httpd-filesystem-2.4.57-8.el9.noarch
httpd-tools-2.4.57-8.el9.x86_64 mod_http2-2.0.26-2.el9_4.x86_64 mod_lua-2.4.57-8.el9.x86_64
nginx-filesystem-1:1.20.1-14.el9_2.1.noarch php-bcmath-8.0.30-1.el9_2.x86_64 php-common-8.0.30-1.el9_2.x86_64
php-fpm-8.0.30-1.el9_2.x86_64 php-gd-8.0.30-1.el9_2.x86_64 php-ldap-8.0.30-1.el9_2.x86_64
php-mbstring-8.0.30-1.el9_2.x86_64 php-pdo-8.0.30-1.el9_2.x86_64 php-pgsql-8.0.30-1.el9_2.x86_64
php-xml-8.0.30-1.el9_2.x86_64 rocky-logos-httpd-90.15-2.el9.noarch zabbix-agent-6.0.30-release1.el9.x86_64
zabbix-apache-conf-6.0.30-release1.el9.noarch zabbix-selinux-policy-6.0.30-release1.el9.x86_64 zabbix-server-pgsql-6.0.30-release1.el9.x86_64
zabbix-sql-scripts-6.0.30-release1.el9.noarch zabbix-web-6.0.30-release1.el9.noarch zabbix-web-deps-6.0.30-release1.el9.noarch
zabbix-web-pgsql-6.0.30-release1.el9.noarch
완료되었습니다!
PostgreSQL 설치
- PostgreSQL 15 버전을 설치합니다.
#Update the system
dnf update

#Install PostgreSQL Repository
 sudo dnf install -y https://download.postgresql.org/pub/repos/yum/reporpms/EL-9-x86_64/pgdg-redhat-repo-latest.noarch.rpm
#Install the PostgreSQL Server
sudo dnf -qy module disable postgresql
sudo dnf install -y postgresql15-server


#Creating a New PostgreSQL Database Cluster
sudo /usr/pgsql-15/bin/postgresql-15-setup initdb

#PostgreSQL 시작
systemctl restart postgresql-15
systemctl enable postgresql-15
systemctl status postgresql-15
- PostgreSQL 환경설정
- vi /var/lib/pgsql/15/data/postgresql.conf
#listen_addresses 수정
listen_addresses = '*'
- vi /var/lib/pgsql/15/data/pg_hba.conf
#추가
host all all 0.0.0.0/0 trust- PostgreSQL 기동
systemctl restart postgresql-15- PostgreSQL 상태확인
$ systemctl status postgresql-15
● postgresql-15.service - PostgreSQL 15 database server
     Loaded: loaded (/usr/lib/systemd/system/postgresql-15.service; enabled; preset: disabled)
     Active: active (running) since Wed 2024-06-05 08:49:21 KST; 24s ago
       Docs: https://www.postgresql.org/docs/15/static/
    Process: 46925 ExecStartPre=/usr/pgsql-15/bin/postgresql-15-check-db-dir ${PGDATA} (code=exited, status=0/SUCCESS)
   Main PID: 46931 (postmaster)
      Tasks: 7 (limit: 47472)
     Memory: 17.4M
        CPU: 79ms
     CGroup: /system.slice/postgresql-15.service
             ├─46931 /usr/pgsql-15/bin/postmaster -D /var/lib/pgsql/15/data/
             ├─46932 "postgres: logger "
             ├─46933 "postgres: checkpointer "
             ├─46934 "postgres: background writer "
             ├─46936 "postgres: walwriter "
             ├─46937 "postgres: autovacuum launcher "
└─46938 "postgres: logical replication launcher "- PostgreSQL Zabbix Metadata Create
sudo -u postgres createuser --pwprompt zabbix
sudo -u postgres createdb -O zabbix zabbix

zcat /usr/share/zabbix-sql-scripts/postgresql/server.sql.gz | sudo -u zabbix psql zabbix
Zabbix server 환경 설정 및 재기동
- Zabbix Server 와 PostgreSQL 서버가 설치 되었다면
- Zabbix 와 PostgreSQL 연결을 위해 zabbix server 환경파일을 수정합니다.
- vi /etc/zabbix/zabbix_server.conf
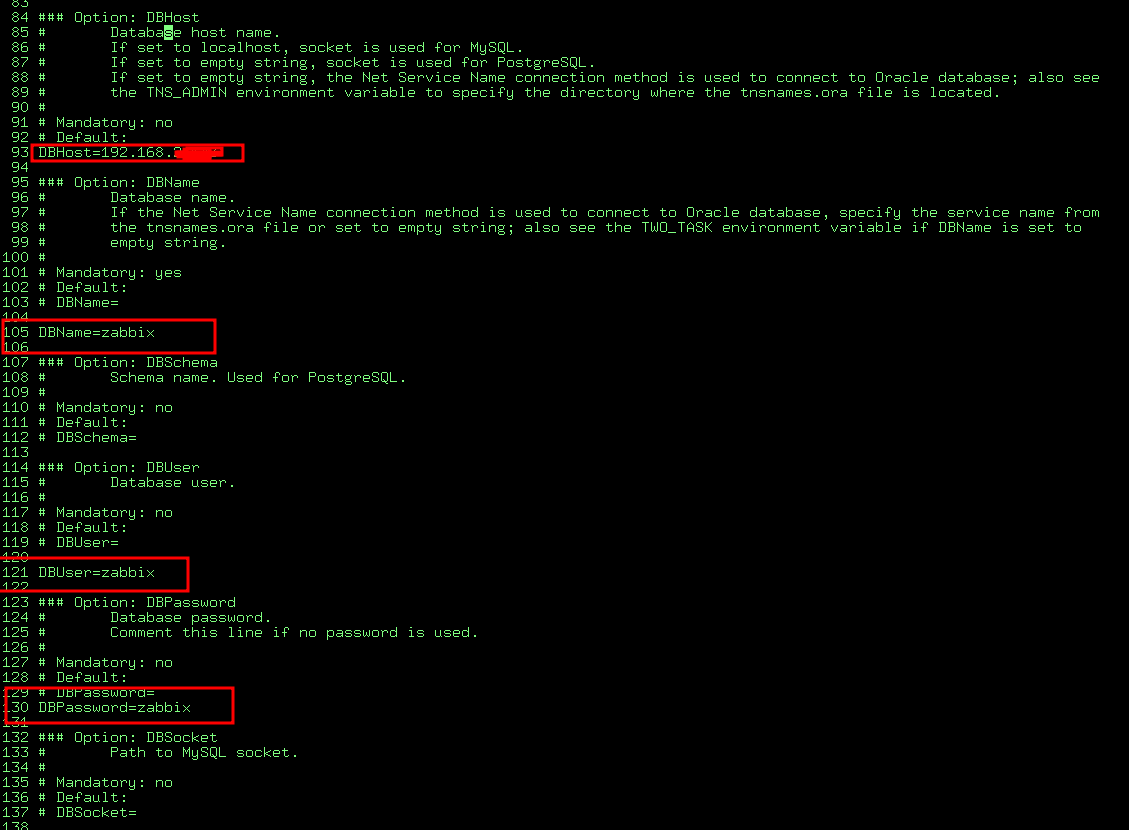
- Zabbix server and agent 재기동
systemctl restart zabbix-server zabbix-agent httpd php-fpm
systemctl enable zabbix-server zabbix-agent httpd php-fpm
Zabbix 웹 브라우저 접속
- http://[서버ip]/zabbix/ 접속

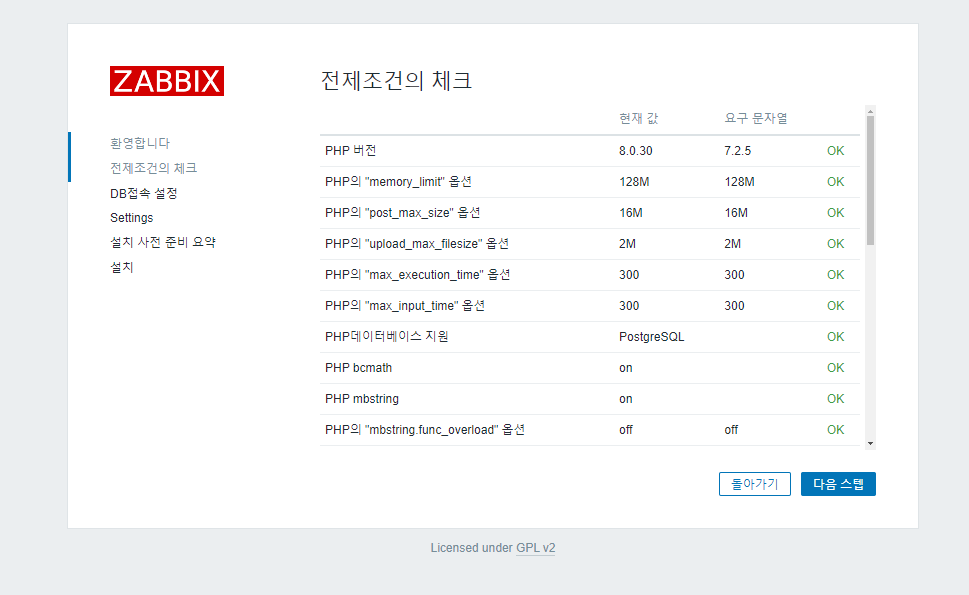
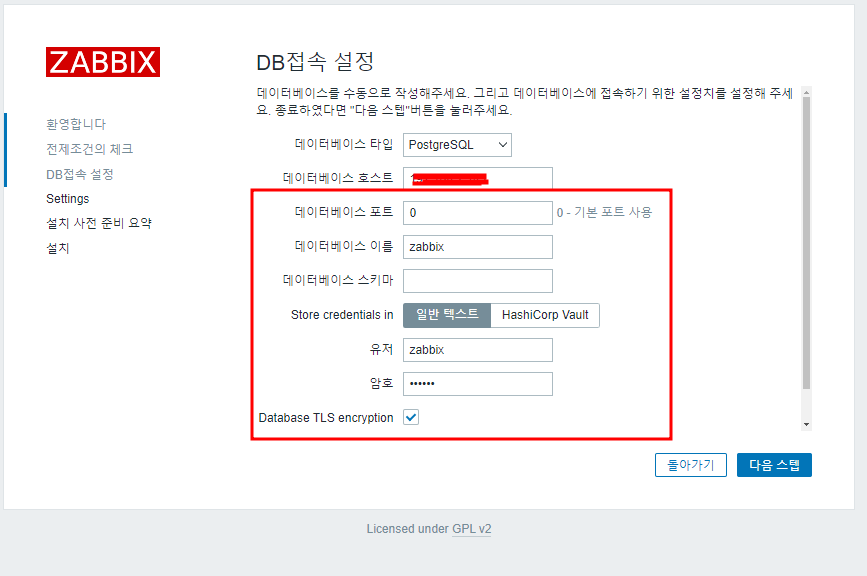
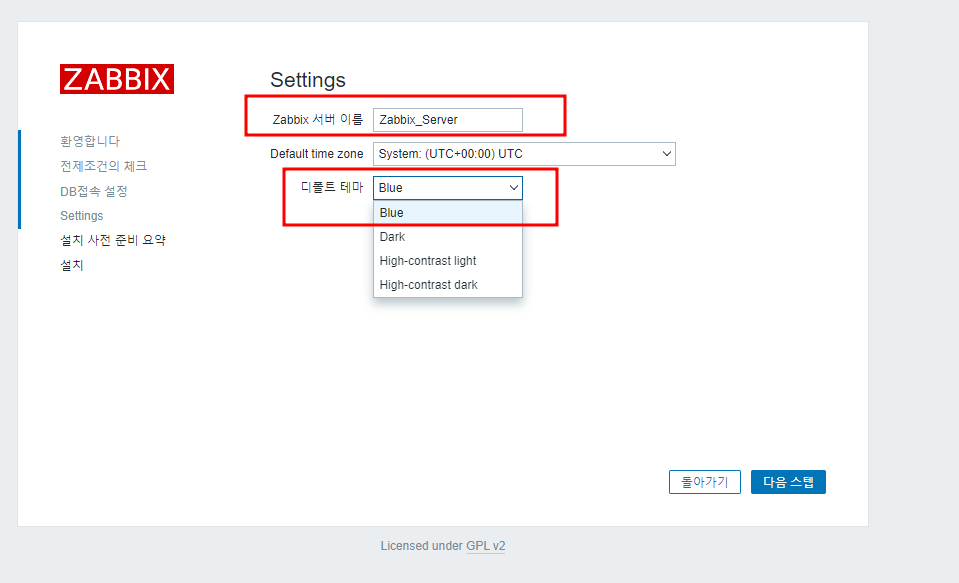
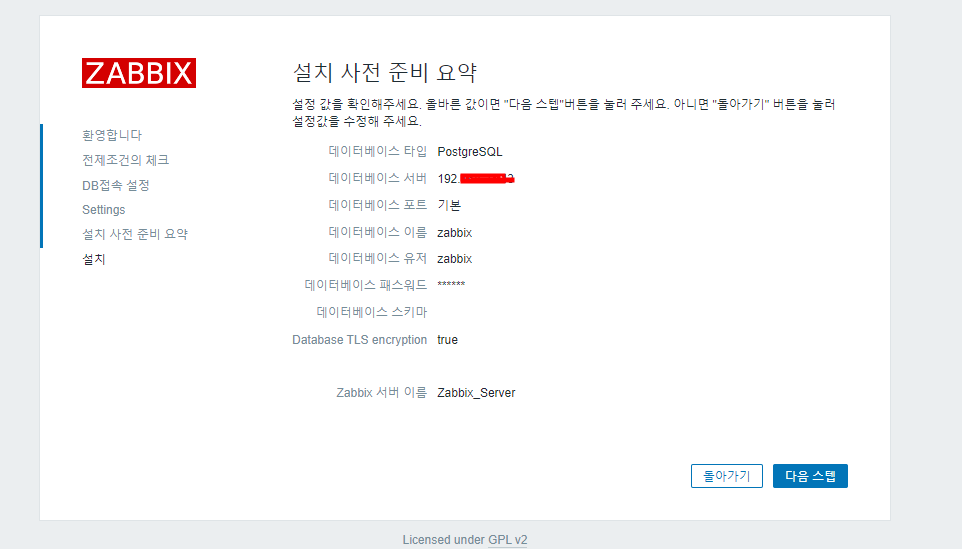
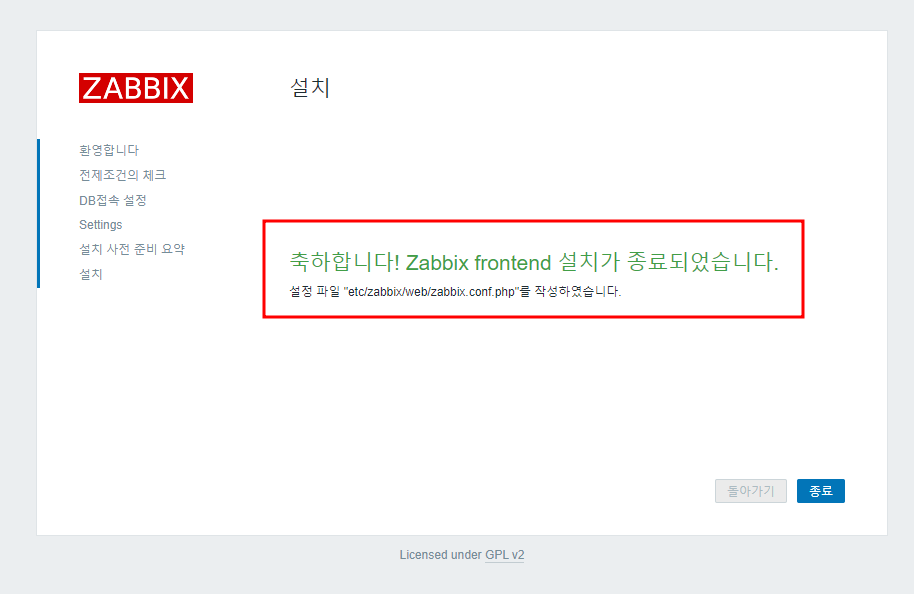
- 설치가 완료되면 Zabbix 웹 페이지에 접속 해서 모니터링 셋팅을 진행 한다.
- http://[서버ip]/zabbix/ 접속
- 최초 접속 비밀 번호는 Admin/zabbix 이다 .
- 하단 그림 처럼 경고 문구가 발생할 경우 zabbix 서버 로그 를 확인 합니다.
- zabbix 서버가 동작하지 않습니다...... .
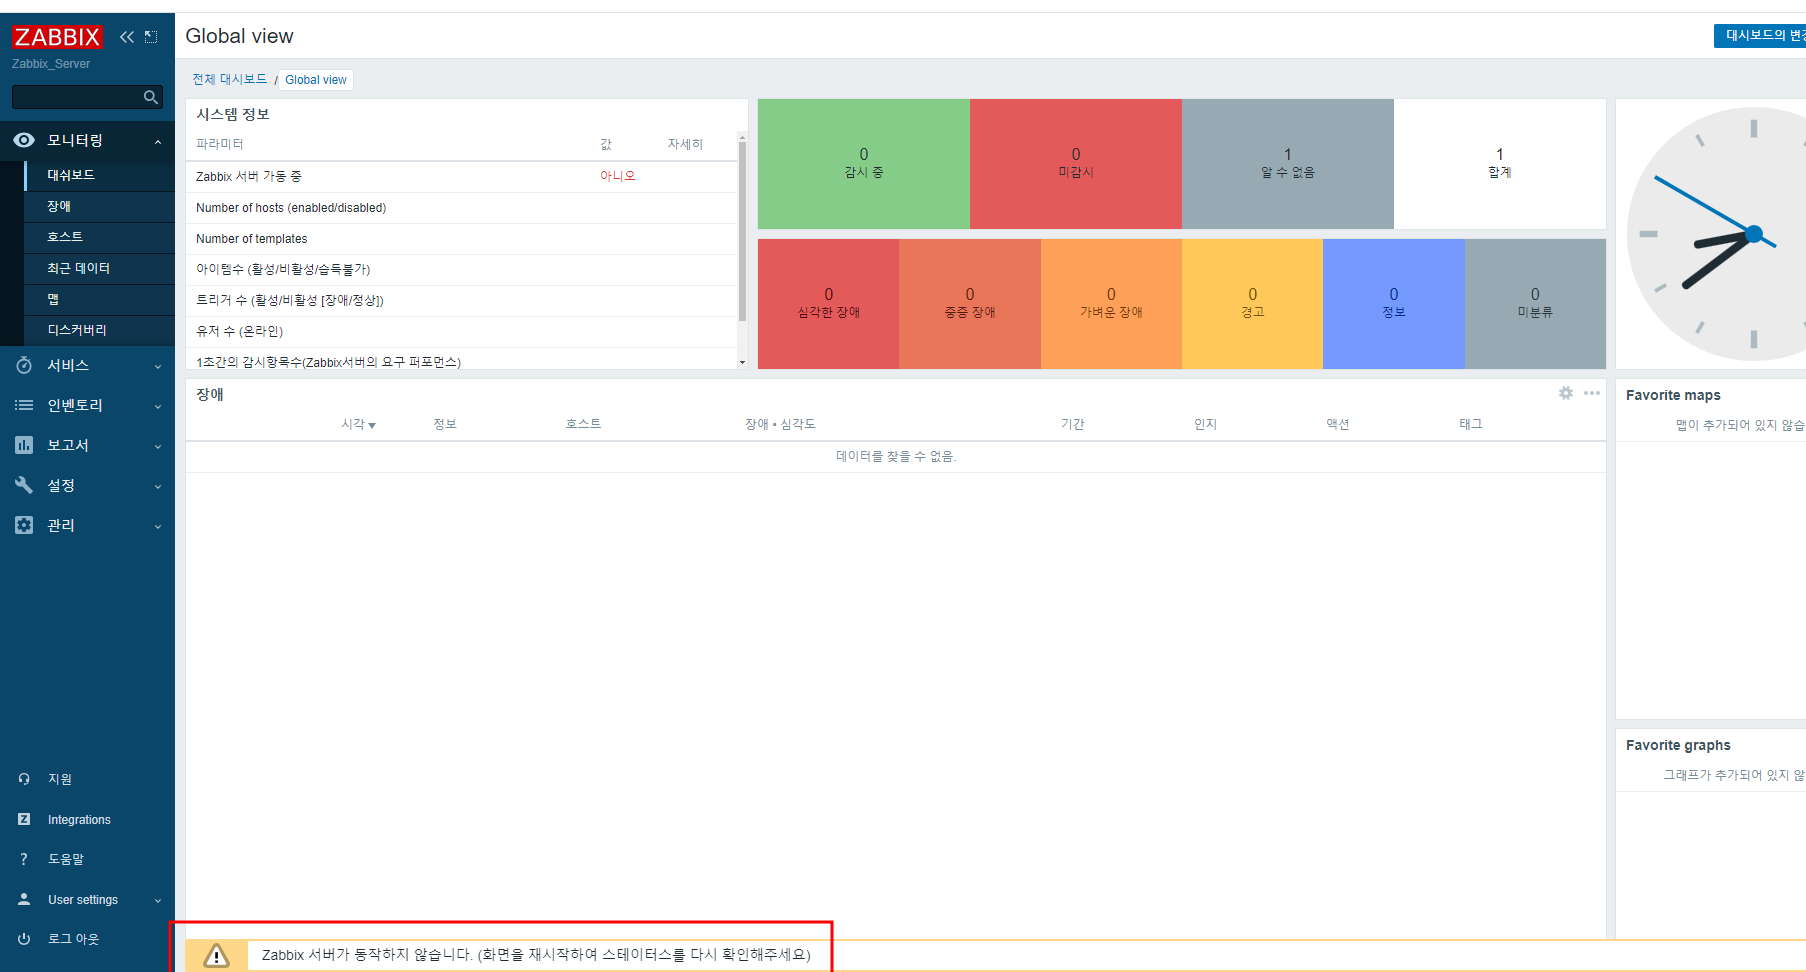
- 아래와 같은 에러 가 발생할경우 zabbix 에서 postgresql 에 접속이 실패할경우 아래 두파일의 설정을 재 확인합니다.
- /var/lib/pgsql/15/data/postgresql.conf
- vi /var/lib/pgsql/15/data/pg_hba.conf
connection to database 'zabbix' failed: [0] connection to server at "localhost" (::1), port 5432 failed: 치명적오류: 사용자 "zabbix"의 password 인증을 실패했습니다
617085:20240530:201041.783 ****** Enabled features ******
617085:20240530:201041.783 SNMP monitoring: YES
617085:20240530:201041.783 IPMI monitoring: YES
617085:20240530:201041.783 Web monitoring: YES
617085:20240530:201041.783 VMware monitoring: YES
617085:20240530:201041.783 SMTP authentication: YES
617085:20240530:201041.783 ODBC: YES
617085:20240530:201041.783 SSH support: YES
617085:20240530:201041.783 IPv6 support: YES
617085:20240530:201041.783 TLS support: YES
617085:20240530:201041.783 ******************************
617085:20240530:201041.783 using configuration file: /etc/zabbix/zabbix_server.conf
617085:20240530:201042.064 [Z3001] connection to database 'zabbix' failed: [0] connection to server at "localhost" (::1), port 5432 failed: 치명적오류: 사용자 "zabbix"의 pa
ssword 인증을 실패했습니다
617085:20240530:201042.064 database is down: reconnecting in 10 seconds
617085:20240530:201052.077 [Z3001] connection to database 'zabbix' failed: [0] connection to server at "localhost" (::1), port 5432 failed: 치명적오류: 사용자 "zabbix"의 pa
ssword 인증을 실패했습니다
617085:20240530:201052.077 database is down: reconnecting in 10 seconds
617085:20240530:201102.089 [Z3001] connection to database 'zabbix' failed: [0] connection to server at "localhost" (::1), port 5432 failed: 치명적오류: 사용자 "zabbix"의 pa
ssword 인증을 실패했습니다
Zabbix 6.0 agent 설치
- 서버 설치후 리모트 서버를 모니터링 하기 위해 agent 를 설치합니다.
- https://www.zabbix.com/download?zabbix=6.0&os_distribution=rocky_linux&os_version=9&components=agent_2&db=&ws=
Download and install Zabbix
Zabbix is being downloaded over 4 000 000 times every year for a reason. Download and install Zabbix for free and try it yourself!
www.zabbix.com

- Rocky Linux release 8.9 서버의 zabbix agent 설치
rpm -Uvh https://repo.zabbix.com/zabbix/6.0/rhel/8/x86_64/zabbix-release-6.0-4.el8.noarch.rpm
dnf clean all

dnf install zabbix-agent2 zabbix-agent2-plugin-*


systemctl restart zabbix-agent2
systemctl enable zabbix-agent2- zabbix_agentd.conf 파일 수정
- Zabbix Server IP 수정
- Zabbix Agent Port 설정

Zabbix 모니터링 구성
- 정상적으로 설치가 완료 되었다면 서버의 자원모니터링 하기 위해 호스트를 등록 합니다.
- zabbix 웹 브라우져에 접속 하여 모니터링 할 agent[호스트]를 등록 합니다.
호스트 등록
호스트 등록 및 대시 보드 작성은 zabbix 5.0 설정과 큰 차이가 없습니다.
이전 글을 참고해서 설정 합니다.
https://growupcoding.tistory.com/114

대시보드 작성

유저 그룹 및 유저 생성
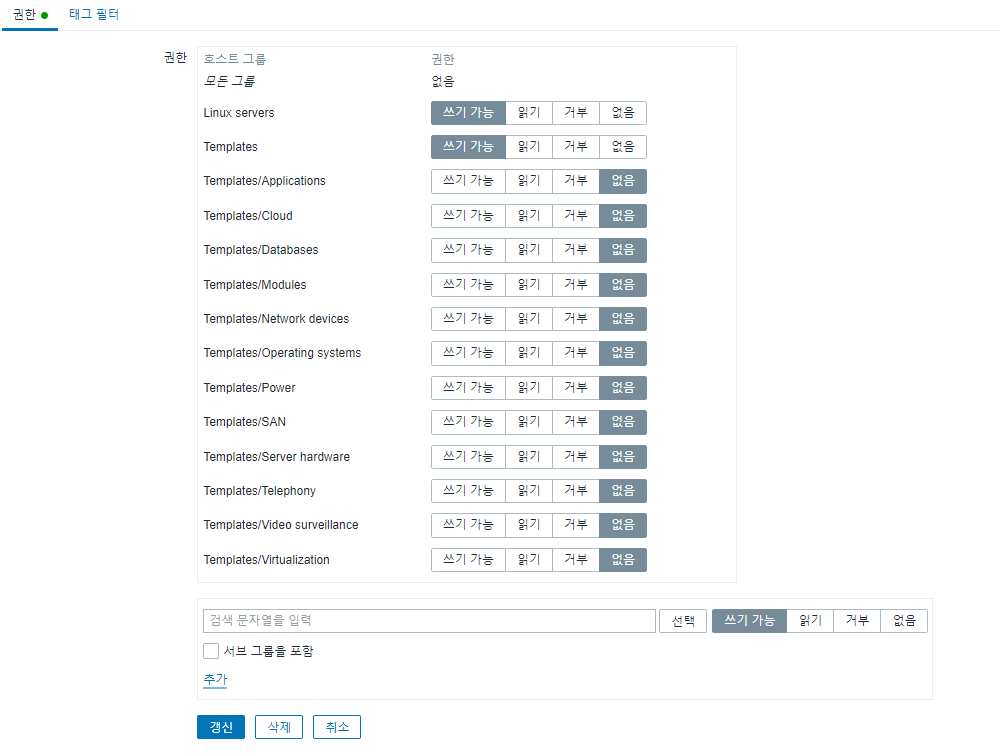
- zabbix 는 유저그룹 및 유저를 생성하여 권한을 부여할수 있습니다.
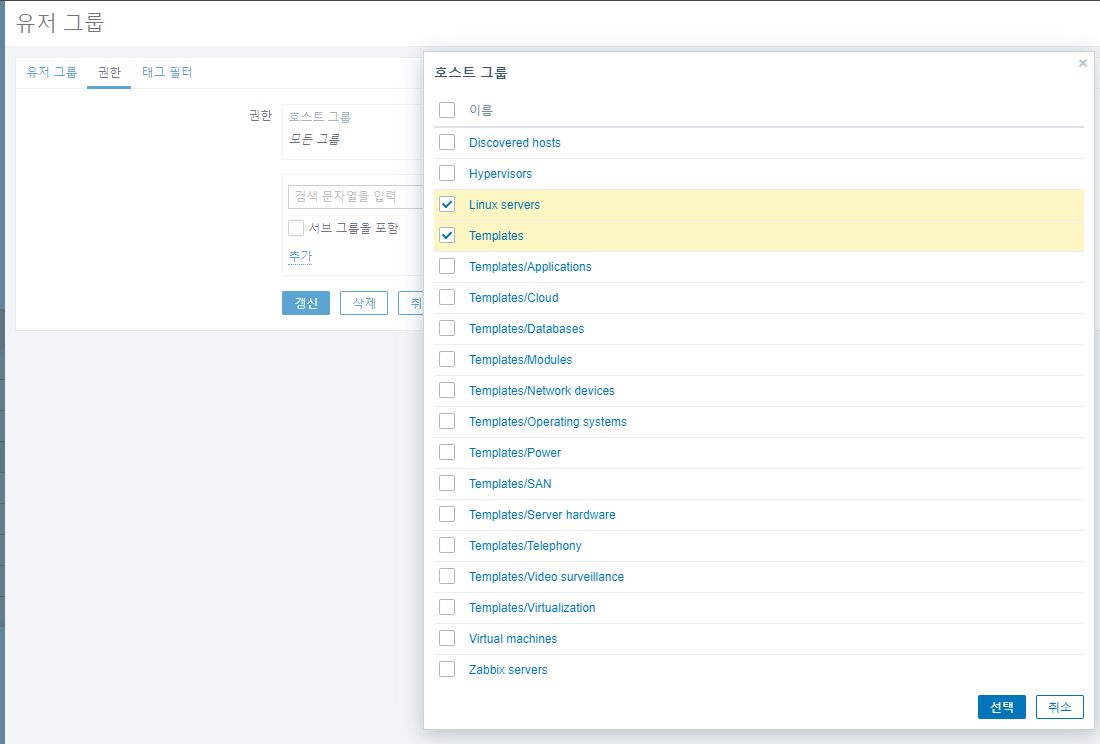
- 좌측 관리 매뉴를 클릭해서 유저 그룹을 생성 합니다.
- 유저 그룹 명을 작성 하고 권한을 선택하하고 추가 버튼을 누르면 신규 생성한 유저 그룹에 부여된 권한을 확인할수 있습니다.
 |
 |
 |
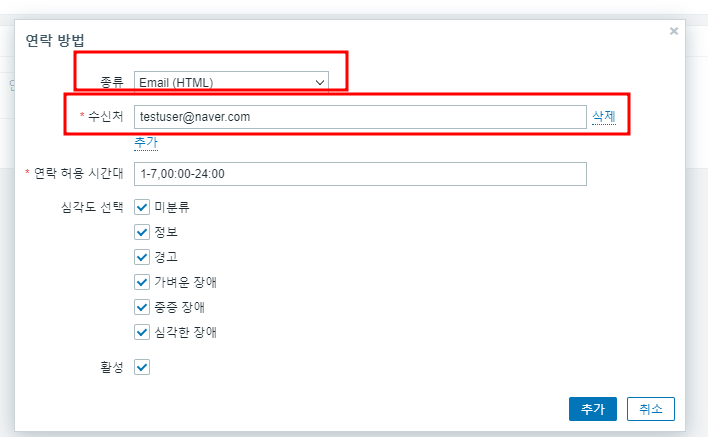
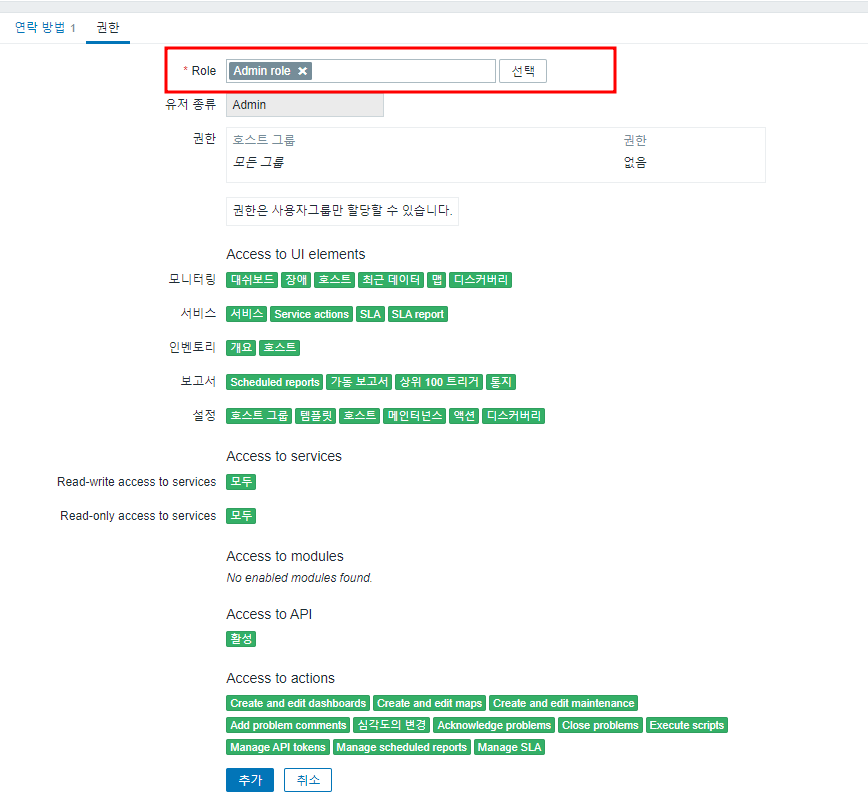
- 좌측 관리 매뉴를 클릭해서 유저를 작성 합니다.
 |
 |
 |
Zabbix 5.0 VS Zabbix 6.0
Zabbix 6.0은 5.0 버전에 비해 성능, 보안, 사용자 인터페이스, 모니터링 기능, 자동화 및 통합 기능 등 여러 면에서 향상되었습니다. 특히, 대규모 환경에서의 성능 최적화, 클라우드 및 컨테이너 모니터링 강화, 사용자 인터페이스 개선, 보안 기능 향상 등이 주요한 차이점입니다. 이러한 개선 사항을 통해 Zabbix는 더욱 강력하고 유연한 네트워크 모니터링 솔루션이 되었습니다.
설치후 크게 변한 부분은 관리 매뉴 처럼 보입니다.

그리고 5.0 에서는 disk 사용하기 위해서는 템플릿을 사용 했었는데
이제는 템플릿을 따로 등록 하지 않아도 기본적으로 확인가능한 지표들이 더 많아 진것 같습니다.
결론은 Zabbix 6.0 이 5.0 보다 모니터링할 지표가 더 많이 추가 되고 사용성이 개선되었다 인것 같습니다.
며칠전 글쓸때는 없었는데... 이제 Zabbix 7.0 도 나왔습니다.

'07.Monitoring > Zabbix' 카테고리의 다른 글
| [Zabbix] Zabbix 5.0 Docker 모니터링 (0) | 2024.05.14 |
|---|---|
| [Zabbix] Zabbix 5.0 알림 설정-Sendmail 연동 (0) | 2024.05.14 |
| [Zabbix]한글 설정 (0) | 2024.04.16 |
| [Zabbix] Centos -Zabbix 5.0 Install (0) | 2024.04.11 |