728x90
반응형
gitlab 올라간 특정 디렉토리만 다운로드 받을 수 있는 방법을 소개 합니다.
일반적으로 git clone 을 수행 하면 gitlab 에 등록된 프로젝트를 모두 다운로드 받게 되는데
이럴경우 원하지 않는 파일도 모두 다운로드 받게 되어 비효율 적입니다.
이번 글에서는 git config core.sparsecheckout true 명령을 통해 프로젝트중 원하는 디렉토리만 다운로드 방법을 소개 하겠습니다.
GitLab 프로젝트 생성
- 테스트위해 우선 임의로 아래 처럼 테스트를 위해 프로젝트를 생성 하고 디렉토리를 만듭니다.
[dev-account@centos7:/home/dev-account/test]$ tree -L 3
|-- guide_doc
| `-- doc
| |-- ReadMe.md
`-- testProject
|-- README.md
`-- guide_doc
|-- doc
`-- etc
6 directories, 3 files
|-- guide_doc
| `-- doc
| |-- ReadMe.md
`-- testProject
|-- README.md
`-- guide_doc
|-- doc
`-- etc
6 directories, 3 files
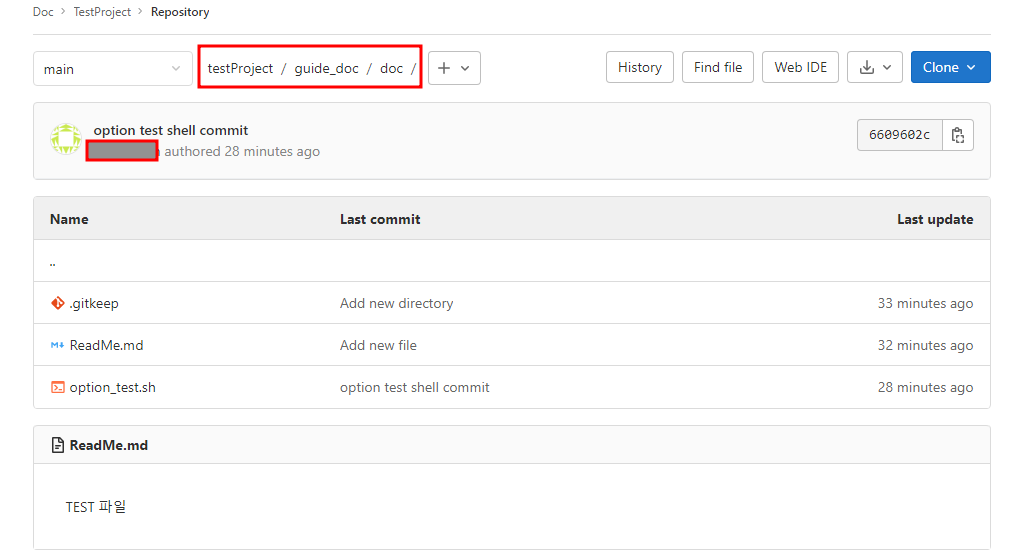
GitLab 특정 디렉토리(폴더) 다운로드
- git lab 에 등록된 파일을 다운로드 받기 위해 test 프로젝트를 만듭니다.
mkdir test
cd test
- 이후 test 디렉 토리로 이동하여 local emtpy repository 를 생성 gitlab 프로젝트 정보를 등록 합니다.
git init

git remote add -f origin http://xxx.xxx.xxx.xxx:6060/comdoc/testProject.git- 특정 디렉토리만 다운로드 받기 위해 sparse-checkout 을 활성화 합니다.
- guide_doc/doc 는 testProject 하위 폴더 입니다.
echo "guide_doc/doc" > .git/info/sparse-checkout
git config core.sparsecheckout true- git pull 명령을 통해 디렉토리를 내려 받습니다.
git pull origin main
git pull origin main
계정 및 비밀번호 입력
remote: Enumerating objects: 13, done.
remote: Counting objects: 100% (13/13), done.
remote: Compressing objects: 100% (10/10), done.
remote: Total 11 (delta 1), reused 0 (delta 0), pack-reused 0
Unpacking objects: 100% (11/11), done.
From http://192.168.17.83:6060/comdoc/testProject
* branch main -> FETCH_HEAD
[dev-account@centos7:/home/dev-account/test]$ ls
guide_doc
[dev-account@centos7:/home/dev-account/test]$ ll
total 0
drwxr-xr-x 4 dev-account dev-account 35 Dec 19 19:35 .
drwx------ 7 dev-account dev-account 193 Dec 19 19:25 ..
drwxr-xr-x 8 dev-account dev-account 162 Dec 19 19:35 .git
drwxr-xr-x 3 dev-account dev-account 17 Dec 19 19:35 guide_doc
GitLab 파일 수정 및 추가 후 업로드 [git push]
- 다운로드 받은 디렉토리에서 파일을 추가 하거나 수정 할경우 아래 절차로 gitlab 서버에 파일을 업로드 할수 있습니다.
- git add [파일명]
- git commit -m "[comment]"
- git push origin main
- 테스트를 위해 임의로 쉘 스크립트를 만들었습니다.
[dev-account@centos7:/home/dev-account/test/guide_doc/doc]$ vi test.sh
#!/bin/bash
while [[ $# -gt 0 ]]; do
case $1 in
-a|--option-a)
arg_a="$2"
shift
;;
-b|--option-b)
arg_b="$2"
shift
;;
*)
# 알 수 없는 옵션에 대한 처리
echo "Unknown option: $1"
exit 1
;;
esac
shift
done
echo "Option -a: $arg_a"
echo "Option -b: $arg_b"
#!/bin/bash
while [[ $# -gt 0 ]]; do
case $1 in
-a|--option-a)
arg_a="$2"
shift
;;
-b|--option-b)
arg_b="$2"
shift
;;
*)
# 알 수 없는 옵션에 대한 처리
echo "Unknown option: $1"
exit 1
;;
esac
shift
done
echo "Option -a: $arg_a"
echo "Option -b: $arg_b"
git add option_test.sh
git commit -m "option test shell commit"- git commit 명령 수행중 에러가 발생하면 에러 내용에 따라 git lab 계정정보를 등록 해주면 됩니다.
*** Please tell me who you are.
Run
git config --global user.email "you@example.com"
git config --global user.name "Your Name"
to set your account's default identity.
Omit --global to set the identity only in this repository.
fatal: empty ident name (for <dev-account@centos7.(none)>) not allowed
[dev-account@centos7:/home/dev-account/test/guide_doc/doc]$ git config --global user.email "test_user@example.com"
[dev-account@centos7:/home/dev-account/test/guide_doc/doc]$ git config --global user.name "test_user "
[dev-account@centos7:/home/dev-account/test/guide_doc/doc]$ git commit -m "option test shell commit"
[master 6609602] option test shell commit
1 file changed, 24 insertions(+)
create mode 100644 guide_doc/doc/option_test.sh
- local 에 저장된 파일을 이제 gitlab 프로젝트로 업로드 합니다.
git push origin main- 아래 에러가 발생 할경우 브렌치를 변경해 줘야 합니다. [master -> main]
error: src refspec main does not match any.
error: failed to push some refs to 'http://xxx.xxx.xxx.xxx/comdoc/testProject.git'
error: failed to push some refs to 'http://xxx.xxx.xxx.xxx/comdoc/testProject.git'
git show-ref
git remote -v
git status

git branch -m master main
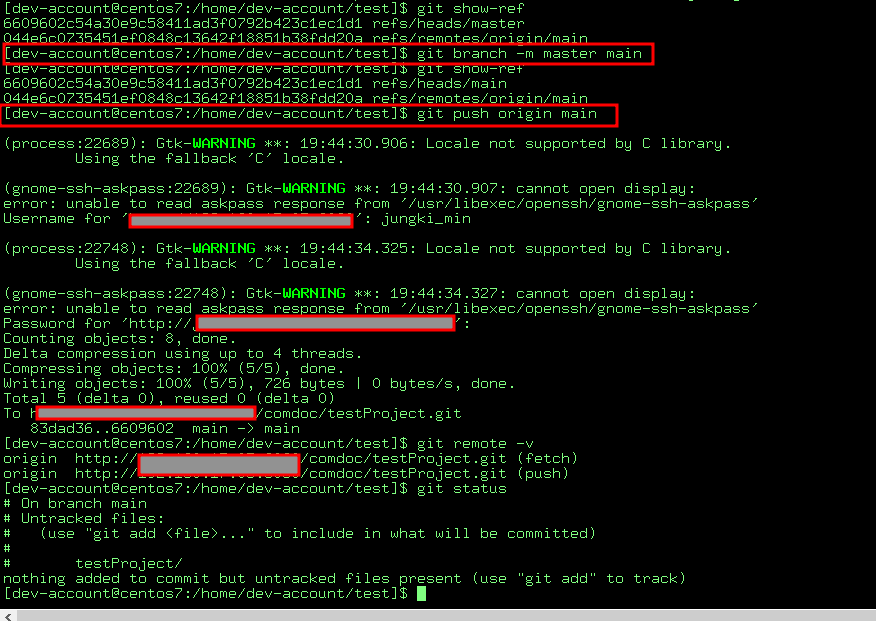
- GitLab 파일 업로드 확인

728x90
반응형